Aaron Charlie
3 Feb 2010
How to Change the Facebook URL of your Fan Page
OK - so your business is increasing its Social Media presence (well done!). You have been working on your Search Engine Optimisation, and you've created a Fan Page for your business on Facebook, but the URL for your Facebook fan page is ridiculously long and impossible for anyone to remember.

If only there was a way to get a nice, short, snappy URL.
Well guess what? THERE IS! Facebook call this a vanity URL.
But - it's a bit of a fiddle. So - read through our simple step by step guide below...
Unsure what to do with the Facebook Timeline? Check out our Complete Guide to Facebook Timeline.
How to Change the URL for your Facebook Fan Page
The URLs that Facebook allocates Fan Pages by default are RUBBISH!
Ours was www.facebook.com/pages/Silicon-Beach-Training/150912562754 - mmmm catchy!
However - we've shortened it to www.facebook.com/SiliconBeach MUCH better!
Here's how...
STEP 1)
Log in to Facebook using the admin account for your Fan Page. This will be the account you were logged in with when you created your Fan Page
Make sure you have at least 25 fans as Facebook won't allow you to set your vanity URL otherwise (in order to help stop spammers / squatters).
STEP 2)
Once you're logged in, put http://www.facebook.com/username/ in to your browser address bar.
Just to be clear - we don't mean replace "username" with your actual username - just type in http://www.facebook.com/username/ - like this:

Note: One of our readers (Michael Stringer) had a problem at this stage which he spent a long time trying to fix (see comments below). If this doesn't work for you - try making someone else an Admin for your page (ask someone you know to become a fan, and then make them an Admin from the fans list) and carry out this procedure logged in as them. This only seems to affect a few people - but many thanks to Michael for pointing it out! Now back to the plot....
STEP 3)
You'll now be taken to a page where you can set a short username for your own Facebook profile (which you can do if you like, whilst we're here!).
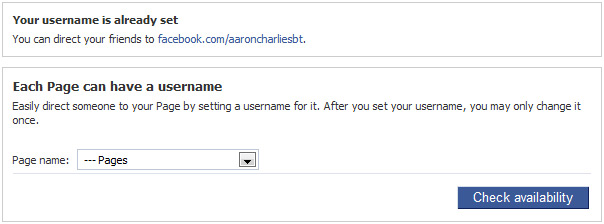
What we're really interested in though is your Fan Page - underneath, you can see a list of the pages you manage:

STEP 4)
Select the Page you want to set a URL for from the dropdown list (if you've only got one that won't be hard!), enter the page name you want (i.e. what you want to appear at www.facebook.com/XXXX) and hit "Check Availability".
Please note that once you change your URL you're stuck with it for life, so think carefully!
If it's available, click "OK" and Bob's your uncle - you've got a lovely short URL to send to everyone!
Now, check out our 'Ultimate Guide to Social Media Marketing' for loads more hints and tips.
