 Enquiry Now

 Contact Us


 Check Out
 +44 20 4571 2395

 PRINCE2® Foundation and Practitioner Training


PRINCE2® PROCESSES – Initiating a Project (IP)
See our training for PRINCE2.
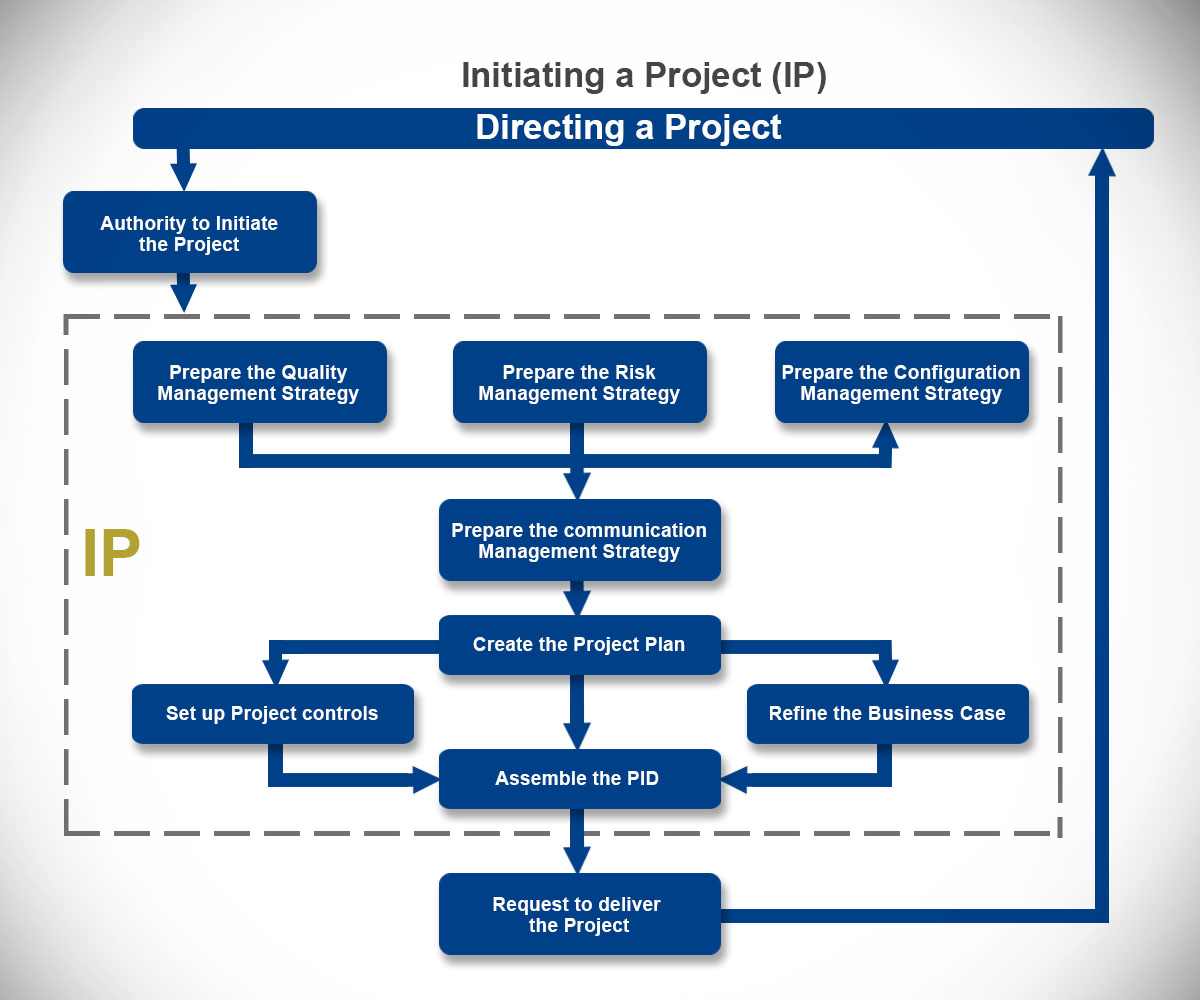
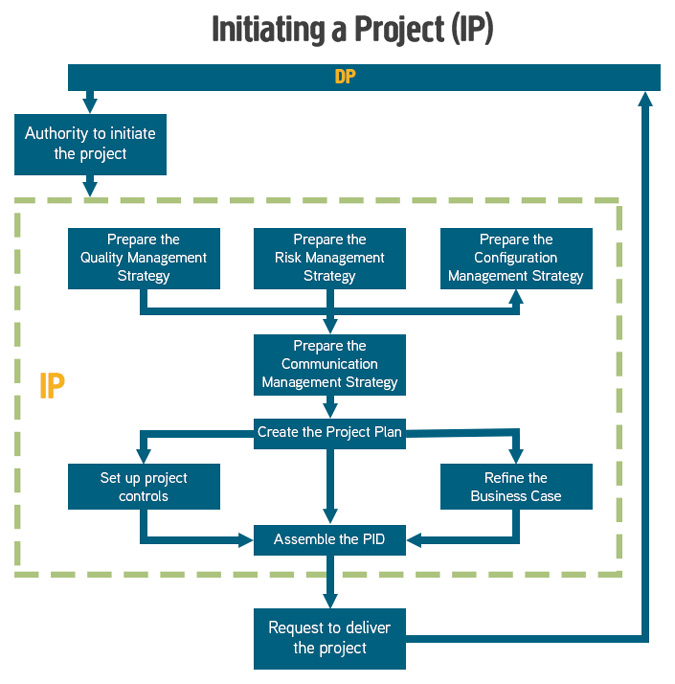
The purpose of the Initiating a Project process is to establish solid foundations for the project, enabling the organisation to understand the work that needs to be done to deliver the project’s products before committing to a significant spend.
The objective of the Initiating a Project process is to ensure that there is a common understanding of:
- The reasons for doing the project, the benefits expected and the associated risks
- The scope of what is to be done and the products to be delivered
- How and when the project’s products will be delivered and at what cost
- Who is to be involved in the project decision making
- How the quality required will be achieved
- How baselines will be established and controlled
- How risks, issues and changes will be identified, assessed and controlled
- How progress will be monitored and controlled
- Who needs information, in what format, and at what time
Other products created and ready for use when the project commences are:
- Risk Management Strategy and Risk Register
- Configuration Management Strategy, Initial Configuration Item Records and Issue Register
- Quality Management Strategy and Quality Register
- Communication Management Strategy
- Project Controls
- Role Descriptions
- Project Management Team Structure
- Project Plan
- Product Descriptions
- Benefits Review Plan
- Detailed Business Case
- Project Initiation Documentation
 Andy Trainer
 12 Jul 2007
PRINCE2® PROCESSES - Managing a Stage Boundary
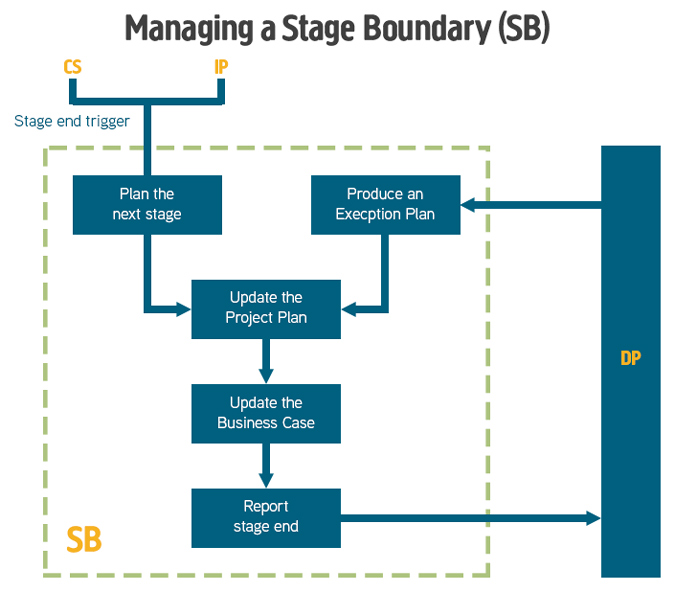
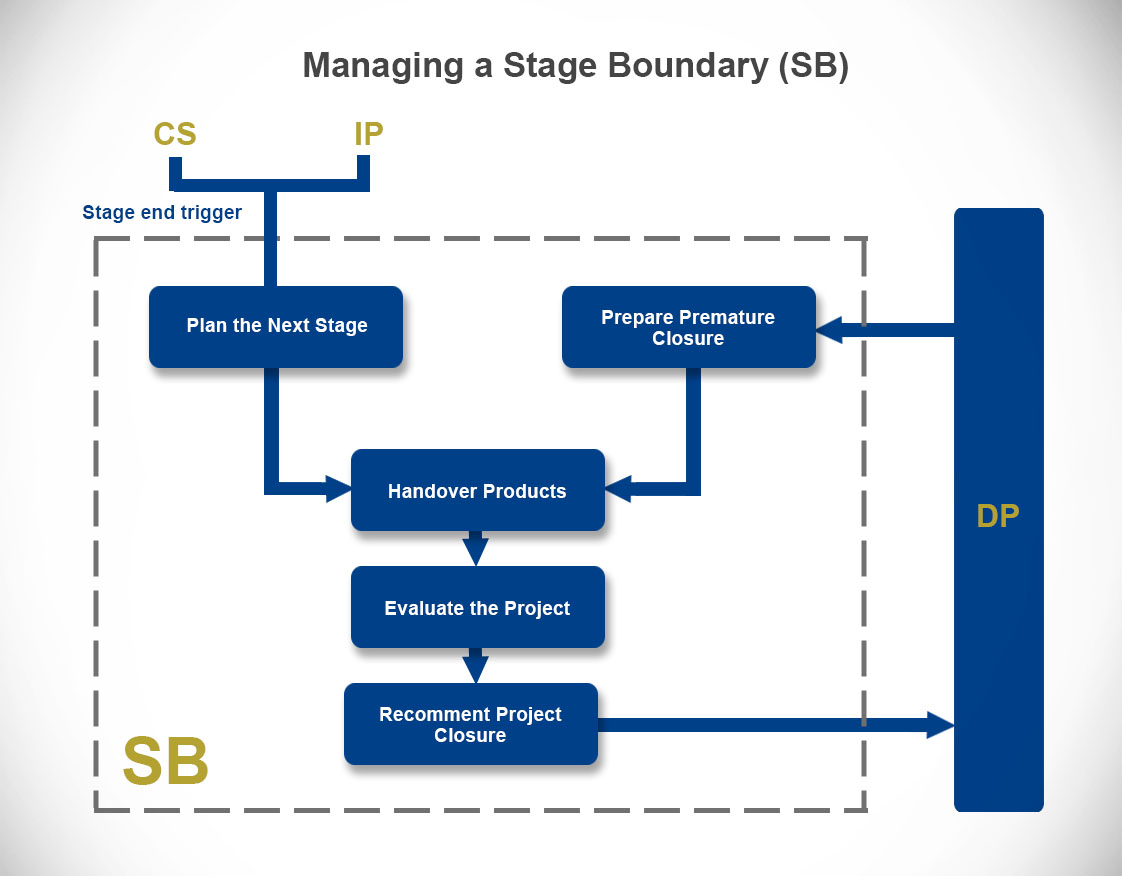
The purpose of the Managing a Stage Boundary process is to enable the Project Board to be provided with sufficient information by the Project Manager so that it can review the success of the current stage, approve the next Stage Plan, review the updated Project Plan, and confirm continued business justification and acceptability of the risks. Therefore, the process should be executed at, or close to the end of, each management stage. The PRINCE2 Processes are covered in detail on our PRINCE2 Foundation training and PRINCE2 Practitioner training courses.
The objective of the Managing a Stage Boundary process is to:
- Assure the Project Board that all products in the Stage Plan for the current stage have been completed and approved
- Prepare the Stage Plan for the next stage
- Review and, if necessary, update the Project Initiation Documentation (in particular the Business Case, Project Plan, project approach, strategies, project management team structure, and role descriptions)
- Provide the information needed for the Project Board to assess the continuing viability of the project – including the aggregated risk exposure
- Record any information or lessons that can help later stages of this project and/or other projects
- Request authorization to start the next stage.
The main products of this process are as follows:
- An End Stage Report produced by the Project Manager and given to the Project Board, outlining information on the current stage achievements.
- Current Stage Plan actuals showing the performance against the original Stage Plan.
- The Next Stage or Exception Plan for approval.
- Project Initiation Documentation may require updating.
- A revised Project Plan incorporating all the actual metrics.
- An updated Risk register, together with the Updated Business Case and Project Plan, which is used by the Project Board to review that the Project has continuing ongoing viability.
- Configuration item records created/updated for new stage products.
- An updated Business Case.
- The Lessons Log.
- Any changes to the Project Management Team with updated Job Descriptions.
Team plans may also be produced when planning the next stage, defining the work packages that will be produced in the next stage.
Andy Trainer
12 Jul 2007
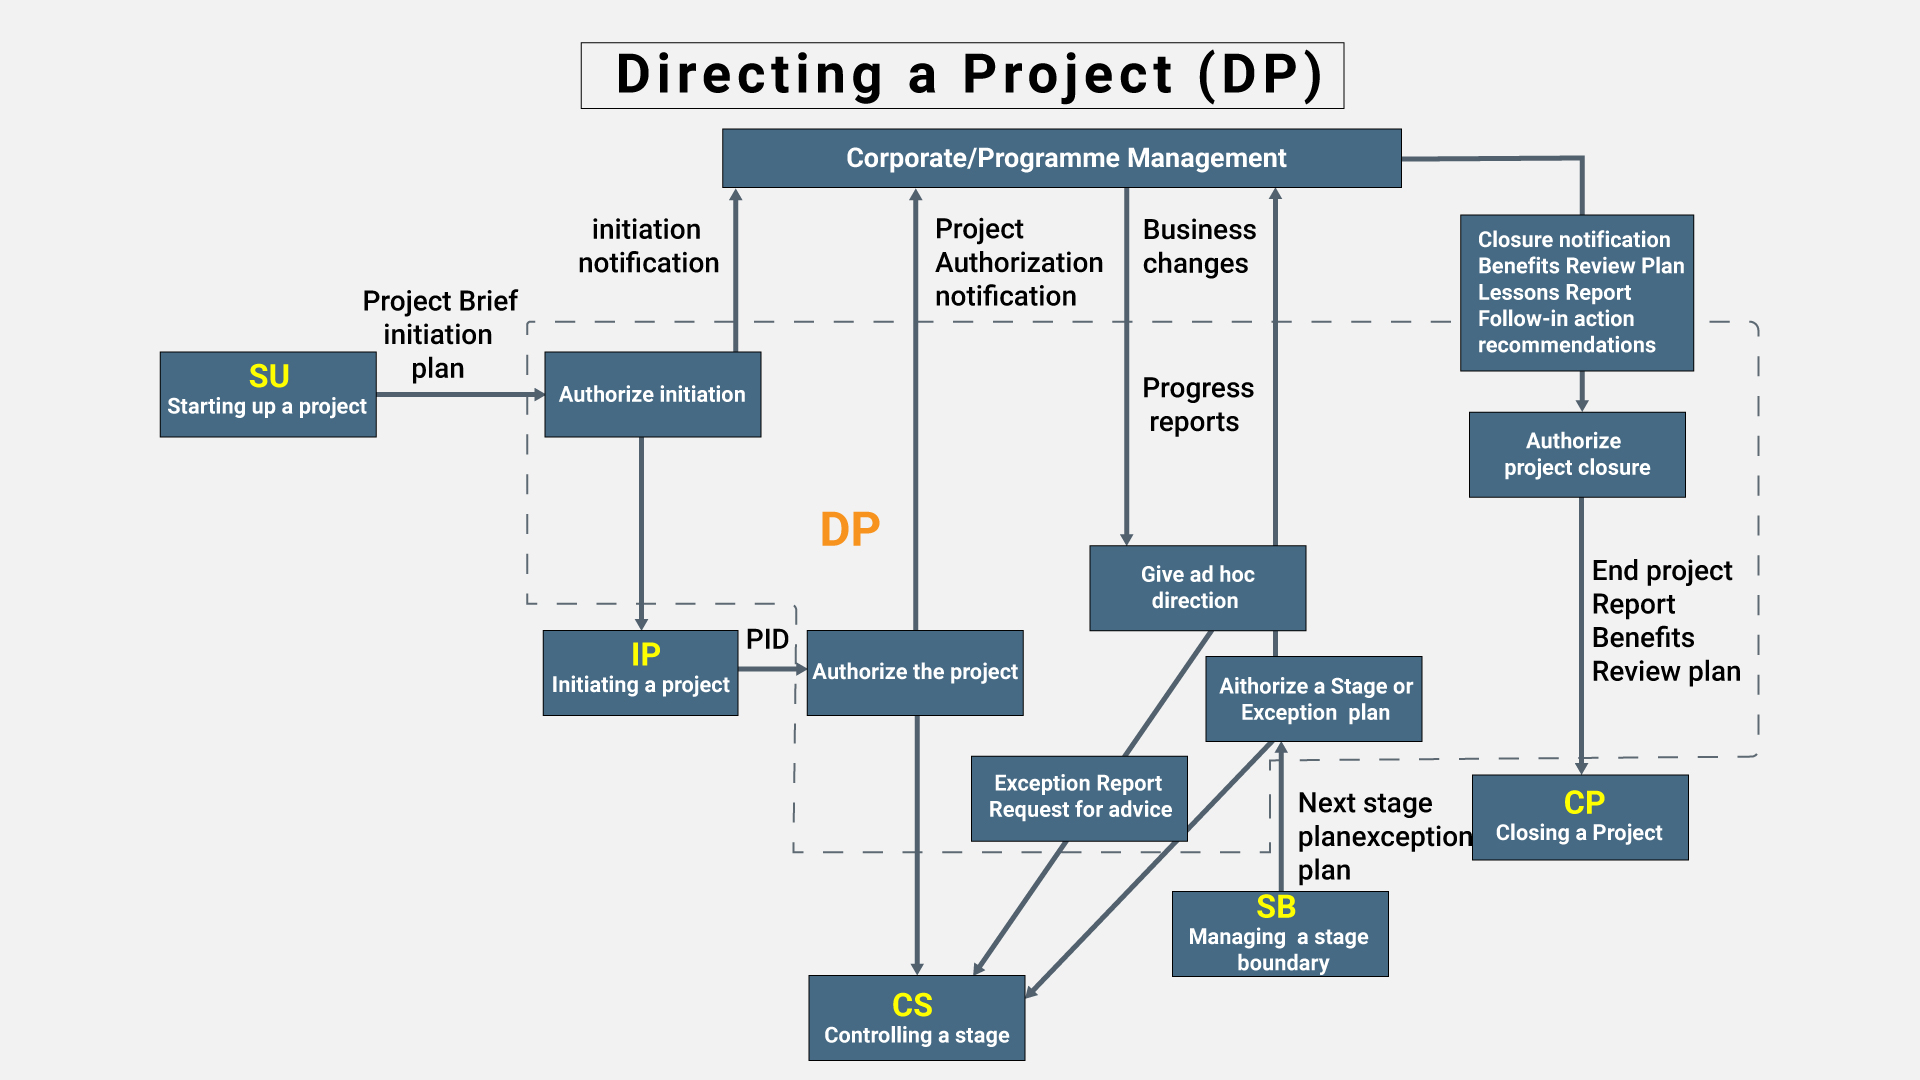
PRINCE2® PROCESSES – Directing a Project (DP)

The purpose of the Directing a Project process is to enable the Project Board to be accountable for the project’s success by making key decisions and exercising overall control while delegating day-to-day management of the project to the Project Manager.
The objective of the Directing a Project process is to ensure that:
- There is authority to initiate the project
- There is authority to deliver the project’s products
- Management direction and control are provided throughout the project’s life, and that the project remains viable
- Corporate or programme management has an interface to the project
- There is authority to close the project
- Plans for realising the post-project benefits are managed and reviewed.
The Directing a Project process starts on completion of the Starting up a Project process and is triggered by the request to initiate a project.
The PRINCE2 processes are covered in detail in our PRINCE2 Foundation course and PRINCE2 Practitioner training courses.
Andy Trainer
12 Jul 2007
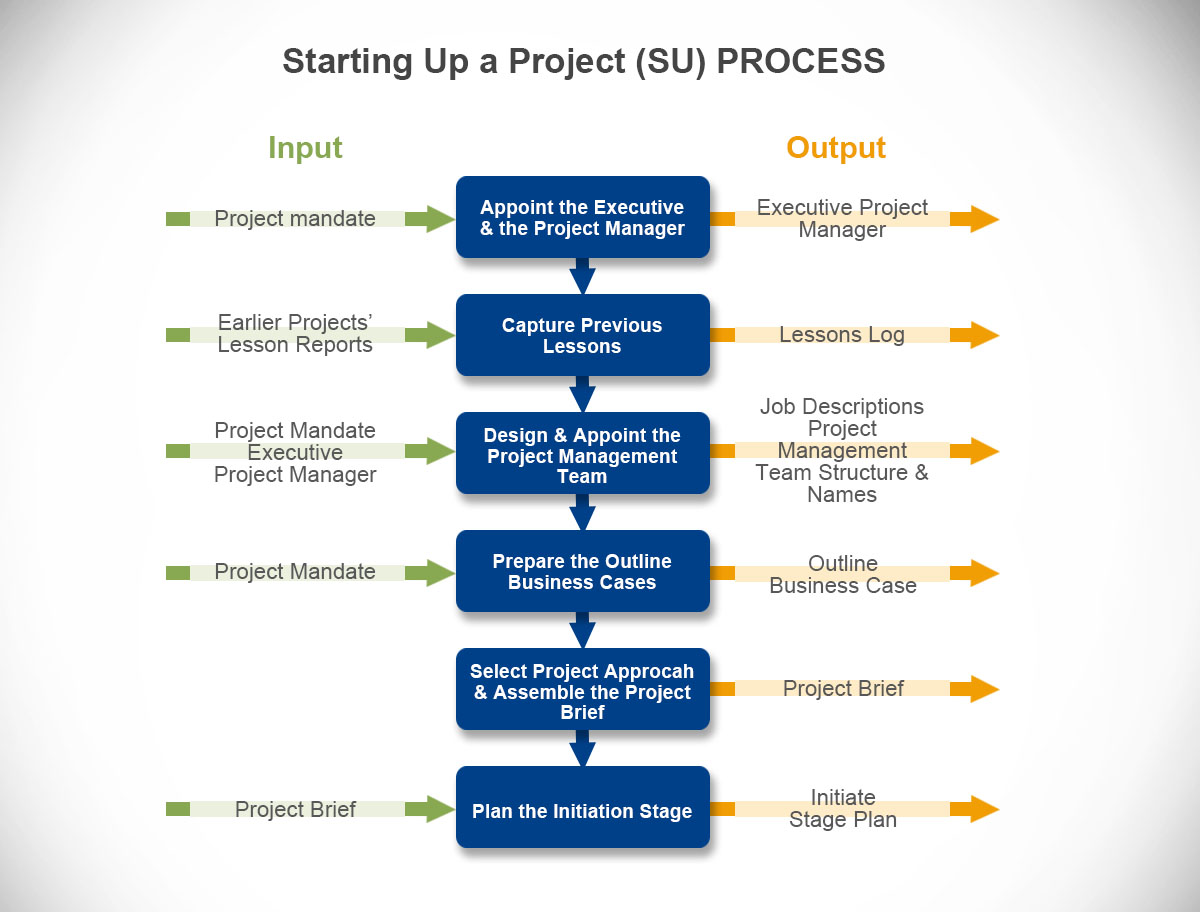
PRINCE2® PROCESSES – Starting Up a Project (SU)
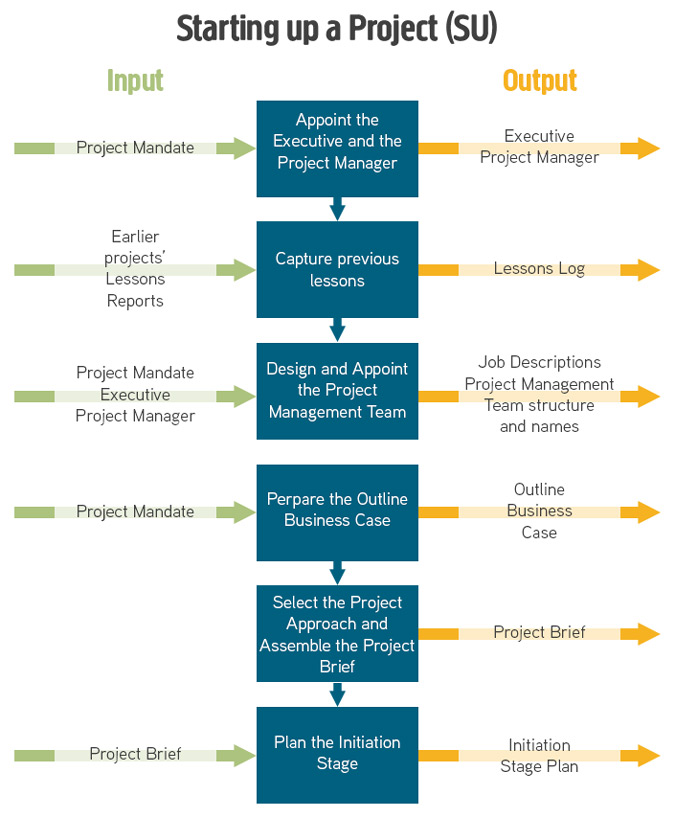
The purpose of the Starting up a Project process is to ensure that the prerequisites for Initiating a Project are in place by answering the question: do we have a viable and worthwhile project?
This process is triggered by a mandate and is designed to establish the following:
- There is a business justification for initiating the project (documented in an outline Business Case)
- All the necessary authorities exist for initiating the project
- Sufficient information is available to define and confirm the scope of the project (in the form of a Project Brief)
- The various ways the project can be delivered are evaluated and a project approach selected
- Individuals are appointed who will undertake the work required in project initiation and/or will take significant project management roles in the project
- The work required for project initiation is planned (documented in a Stage Plan)
- Time is not wasted initiating a project based on unsound assumptions regarding the project’s scope, time scales, acceptance criteria, and constraints.
Products produced during this process are as follows:
- Role descriptions
- Daily Log
- Lessons Log
- Outline Business Case
- Project Product Description
- Project Approach
- Project Brief
- Stage Plan
The PRINCE2 processes are covered in detail in our PRINCE2 Foundation training and PRINCE2 Practitioner training courses in Brighton, Sussex.
Andy Trainer
12 Jul 2007
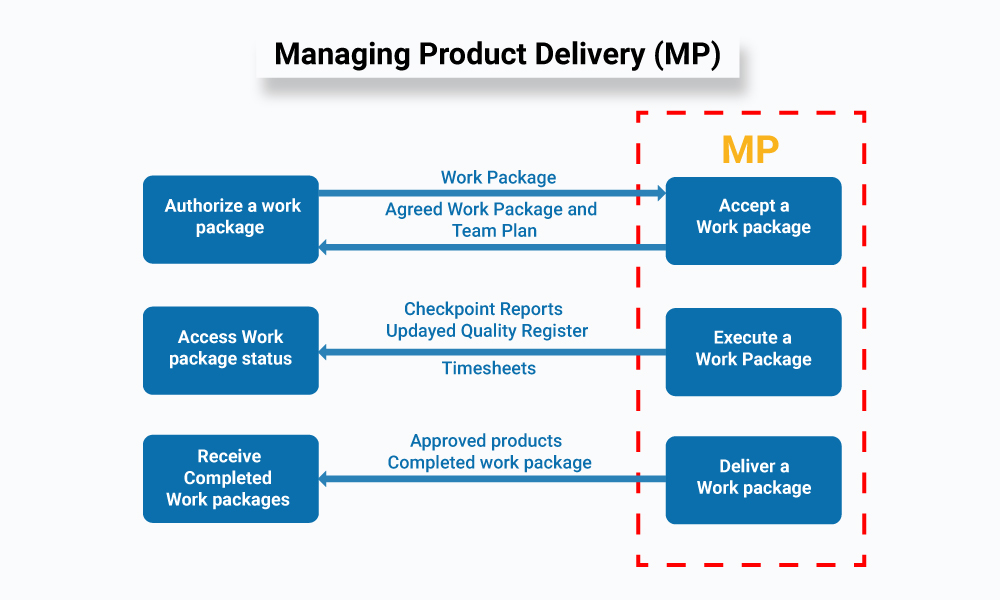
PRINCE2® PROCESSES – Managing Product Delivery (MP)
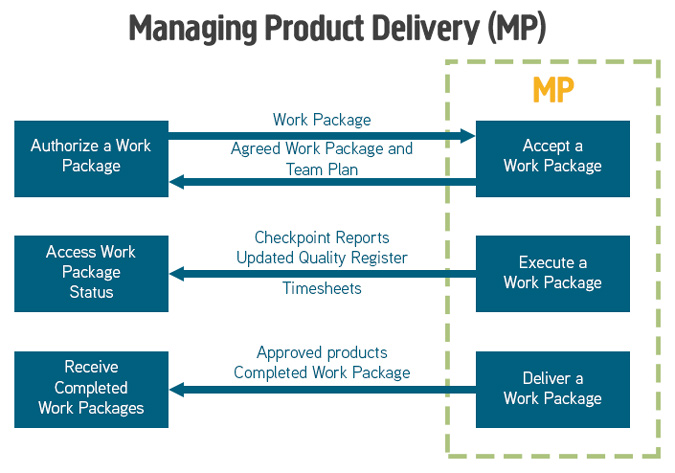
The purpose of the Managing Product Delivery process is to control the link between the Project Manager and the Team Manager(s), by placing formal requirements on accepting, executing and delivering project work.
The role of the Team Manager(s) is to coordinate an area of work that will deliver one or more of the project’s products. They can be internal or external to the customer’s organisation.
The objective of the Managing Product Delivery process is to ensure that:
- Work on products allocated to the team is authorised and agreed.
- Team Managers, team members and suppliers are clear as to what is to be produced and what is the expected effort, cost or timescales.
- The planned products are delivered to expectations and within tolerance.
- Accurate progress information is provided to the Project Manager at an agreed frequency to ensure that expectations are managed.
Products that are created or updated during this process are:
- Team plans with actual dates.
- Risk register with any identified work package level risks.
- Quality register with all quality work that is being undertaken.
- Configuration Item Records with the latest status of products produced.
- Project Issues with status information and impact analysis for current or new issues identified.
- Checkpoint Reports providing regular progress information to the Project Manager.
Silicon Beach Training is an accredited training organisation for PRINCE2 Training.
Andy Trainer
12 Jul 2007
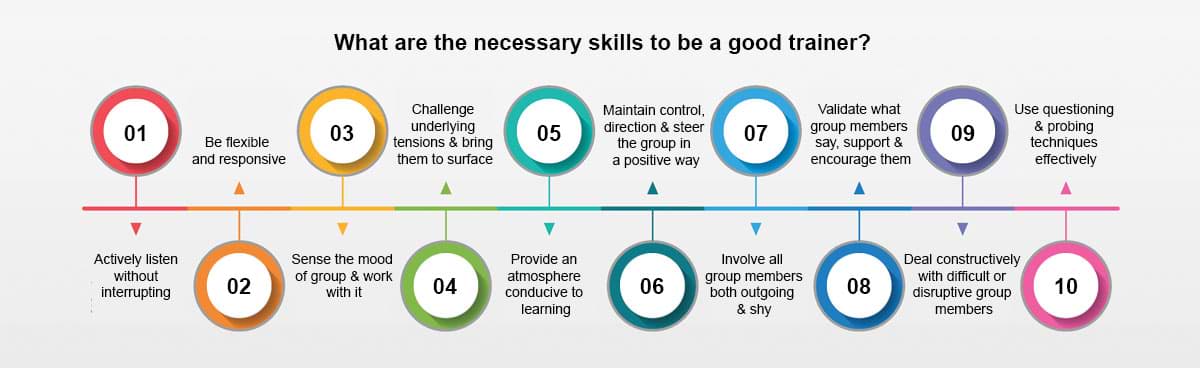
What are the necessary skills to be a good trainer?
Train the Trainer
At Silicon Beach Training we provide a train the trainer course to teach you the skills you need to become a great trainer. However, if you think you already have what it takes - try this 10-point self-assessment!
Can you...
- Actively listen without interrupting?
- Be flexible and responsive?
- Sense the mood of the group and work with it?
- Challenge underlying tensions or hidden feelings and bring them to the surface?
- Provide an atmosphere conducive to learning?
- Maintain control and direction and steer the group in a positive way?
- Involve all members of the group both outgoing and shy?
- Validate what group members say, support and encourage them?
- Deal constructively with difficult or disruptive group members?
- Use questioning and probing techniques effectively?
These are just some of the more subtle aspects in which an effective trainer needs to be proficient.
REMEMBER- training is a skilled process, it can look easy but it isn't! Trying to facilitate a group in the same way as chairing a meeting will not have the desired result and can cause many more problems than it solves!
Listening
Active listening is the key skill for a trainer.
You probably already know this (but sometimes it helps to be reminded!): Listening is very different from hearing. When we hear, the information may flow through our ears without really registering in the brain.
Listening has at least three different stages: hearing, interpreting, and recalling.
- Hearing: the physical action of the sound on our ear
- Interpreting: interpreting the message from the words that we hear, the tone and inflection of the voice, as well as the person's facial expressions and body movements. We also make interpretations dependent upon our own experiences in life.
- Recalling: registering the message and recalling it later in the conversation.
Active listening involves all three of these processes and means you need to:
- Give your complete attention to the other person or people for a specific period of time
- Forget any preoccupations you may have
- Suspend your judgement about what they are saying
- Listen to the feeling behind the words and reflect it to the group using phrases like; "it sounds as if you are very angry about that, is that right?"
- Listen to the silence and what it means; is it a comfortable or an angry silence?
- Watch for any non-verbal clues from group members; they will help let you know when someone is disinterested, shy, anxious, domineering, bored, angry, or open etc
Andy Trainer
6 Apr 2007
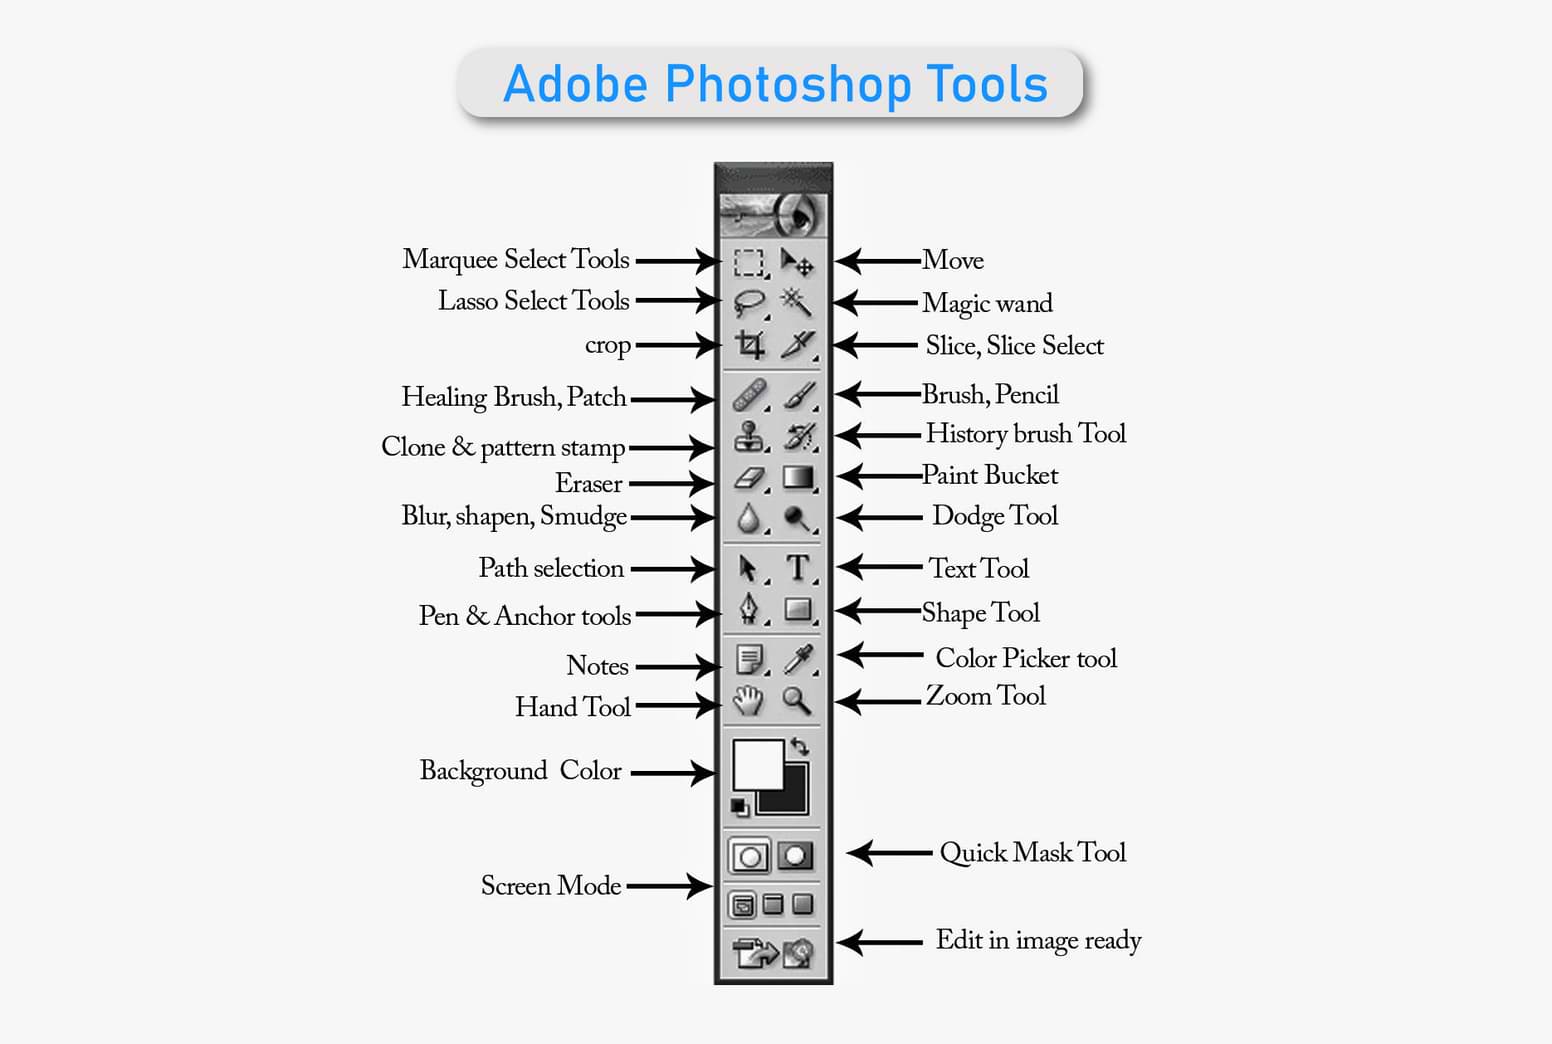
Photoshop tools are found in the Toolbox, which appears on the left side of the screen when you first start Photoshop. When you see a little arrow in the bottom corner it means that you can reveal other tools by clicking on the arrow. You can learn more about all the Photoshop tools and how they are used on our Photoshop courses, including Lightroom training.
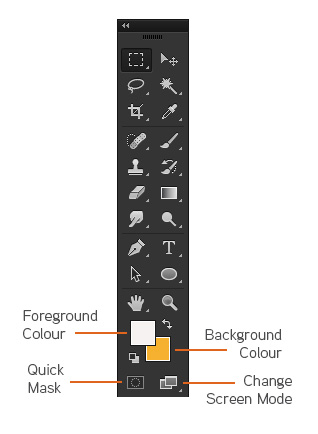
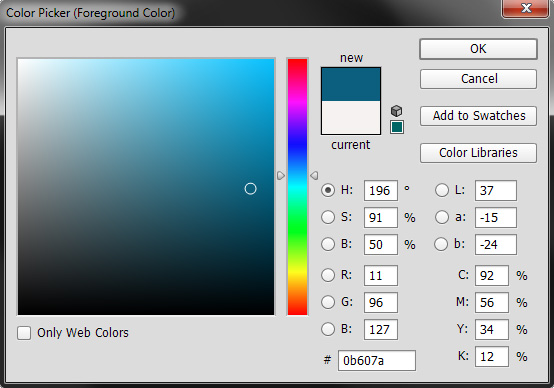
Apart from the Photoshop tools listed below you can select your foreground and background colours here. Double clicking on foreground or background squares will bring up the colour picker.
Clicking on the small black and white squares will bring the colour well back to black and white. Some useful keyboard shortcuts to remember and get used to are the X key to swap the foreground and background colours, and D to set the colours to their default settings.
You can also create masks (though it can be easier through the layers palette), change workspace view or go to image ready.
| Button | Tool Name | Action |
|---|---|---|
| Rectangular Marquee | Rectangular Marquee - Makes a rectangular selection and provides access to the Elliptical, Single Row, and Single Column Marquee Tools | |
| Move | Move - Moves selections, layers, and guides (rulers) | |
| Lasso | Lasso - Draws free-hand segments of a selection's border and provides access to the Polygonal Lasso Tool and Magnetic Lasso Tool | |
| Magic Wand | Magic Wand - Selects consistently coloured areas without requiring you to trace the outline | |
| Crop | Crop - Removes unwanted portions from an image. | |
| Eyedropper | Eyedropper - Allows you to get colors from an image to designate as a new background or foreground color. It also provides access to the Color Sampler and Measure Tools | |
| Spot Healing Brush | Spot Healing Brush - Corrects imperfections in an image by making them disappear into the surrounding image. It also provides access to the Healing Brush Tool, Patch Tool, and the Red Eye Tool | |
| Brush | Brush - Paints brush strokes onto an image and provides access to the Pencil Tool and Color Replacement Tool | |
| Clone Stamp | Clone Stamp - Paints a clone of an image or area of an image you have already selected. It also provides access to the Pattern Stamp Tool | |
| History Brush | History Brush - Paints a copy of one image state or snapshot of an image into your current image's window. It also provides access to the Art History Brush Tool | |
| Eraser | Eraser - Erases pixels wherever the mouse is clicked. It also provides access to the Background Eraser and Magic Eraser Tools | |
| Gradient | Gradient - Creates a gradual blend fill between colors and also provides access to the Paint Bucket Tool. For more information, see Working with the Gradient Tool | |
| Blur | Blur - Softens the edges of an image. It also provides access to the Sharpen and Smudge Tools | |
| Dodge | Dodge - Allows you to darken or lighten areas of an image. It also provides access to the Burn and Sponge Tools | |
| Path Selection | Path Selection - Makes shape or segment selections that show anchor points, direction lines, and direction points. It also provides access to the Direct Selection Tool | |
| Horizontal Type | Horizontal Type - Allows you to insert text onto an image. It also provides access to the Vertical Type, Horizontal Type Mask, and Vertical Type Mask Tools | |
| Pen | Pen - Allows you to create, edit, or smooth lines and shapes. It also provides access to the Freeform Pen, Add Anchor Point, Delete Anchor Point, and Convert Point Tools | |
| Draw Rectangle | Rectangle - Allows you to draw different shapes. It also provides access to the Rounded Rectangle, Ellipse, Polygon, Line, and Custom Shape Tools. | |
| 3D Rotate Tool | 3D Rotate Tool - Allows you to rotate the document canvas. It also provides access to the 3d Roll View, Pan View, Walk View and Zoom Tools. | |
| 3D Orbit Tool | 3D Rotate Tool - Allows you to change the position or scale of a 3D model.. It also provides access to the 3d Rotate, 3D Roll, 3D Pan, 3D Slide and 3D Scale Tools. | |
| Hand | Hand - Moves an image within its window | |
| Zoom | Zoom - Magnifies or reduces the view size of an image |
Heather Buckley
21 Feb 2007
 Need Any Help?
Recent Blogs


 Enquire Now


