Enquiry Now

 Contact Us


 Check Out
 +44 20 4571 2395

 PRINCE2® Foundation and Practitioner Training


 Craig Charley
 23 Oct 2013
How to Create Interactive InDesign Forms and Buttons
This week Adobe announced that they've now surpassed 1 million subscribers to Creative Cloud - the subscription-based package that replaced Creative Suite.
That's great news as our newest course - InDesign Interactive PDF Training - includes some great new interactive features only available on InDesign CS6 and InDesign CC.

In this post I'm going to cover one of the best new features of InDesign - Interactive Forms - as they are not included in our standard 2-day Interactive PDF course. If you would like a tailored course to include interactive forms then please call us on 01273 622272.
As well as some quick tutorials for adding different types of forms and buttons, I'm also going to run through some quick tips and considerations.
If you're more of an InDesign beginner then why not download our free InDesign Paragraph Styles eBook? It's great way to get to grips with one of the basic features of InDesign.
Before InDesign CS6, if you wanted to add a form to a document you had to do design the look of your form in InDesign and then add the functionality in Acrobat. For the best results you had to create very simple boxes otherwise Acrobat wouldn't recognise them as form fields.
With InDesign CS6 and CC you can place interactive forms and buttons directly into InDesign documents and export them as Interactive PDFS. Here's how:
Open up InDesign and create a new document, or open a document that you want to add a form to.
To access all the form options easily, change your workspace to 'Interactive for PDF' - you should now see all the interactive PDF windows in the sidebar.
If you're starting from scratch, then add a simple rectangle to your document. If you're using an existing document then select an object that you want to turn into a form
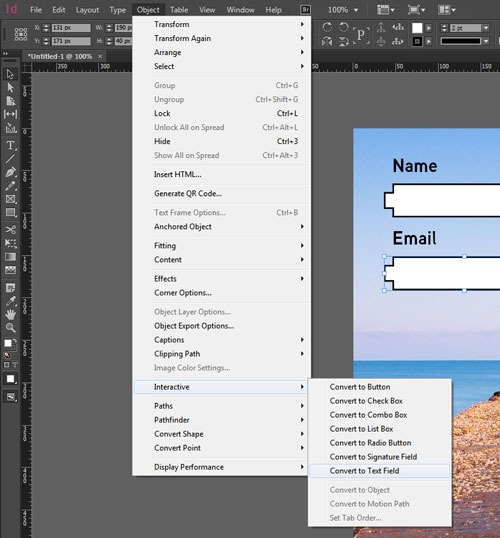
InDesign Form Text Fields
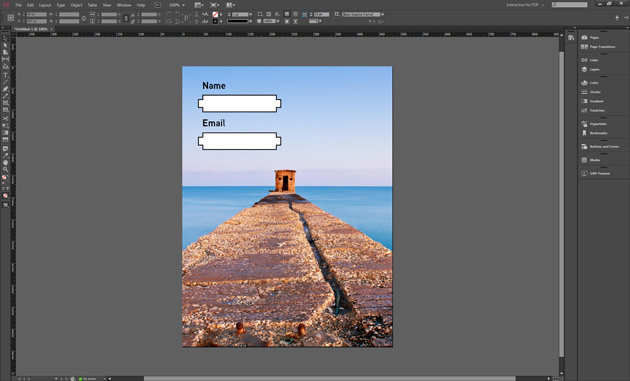
As you can see below, I have two form fields that I want to convert to text fields.
Select the first field, click on Buttons and Forms and select Text Field from the Type options.
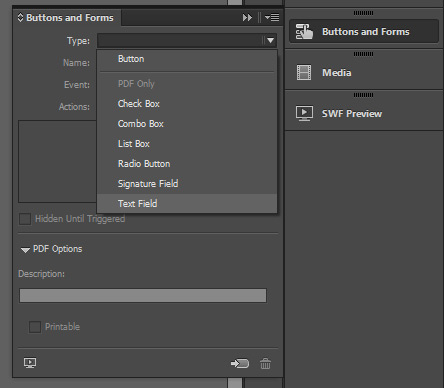
Alternatively you can go to Object > Interactive > Convert to Text Field for the same result.
Adding a Submit Button to InDesign PDFs
Next I'm going to add a Submit button.
Firstly, I've selected the object and uses Buttons and Forms to make it a button.
I'm then going to give the submit button a destination by adding an Event.
Choose 'On Click' and then click the + button next to Actions. This will bring up a list of options, choose Submit Form.
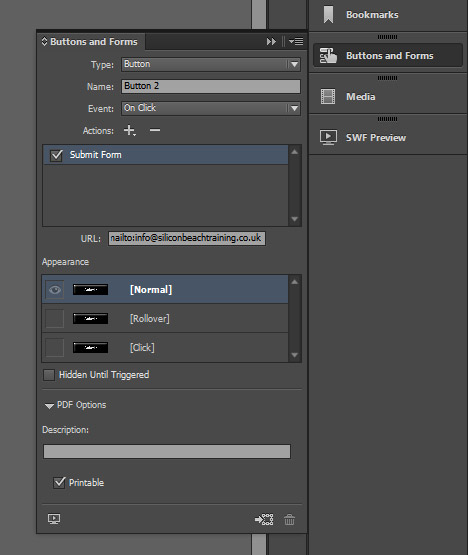
This is one of the newest button features and allows you specify an email address to send the completed form to. Add your email address in using "mailto:" and you're all set.
If you want to make your buttons flashier, you can change the appearance of the object for different states - Rollover and Click.
This is very easy to do. Use the 'show' check box to decide which states to use. I'm using [Click].
Once selected, you can then change the appearance of the object for that state.
Using Radio Buttons/Check Boxes
The easiest way to add radio buttons, check boxes, list boxes etc. is to use the Sample Buttons and Forms panel. This allows you to drag and drop pre-designed buttons into your document.
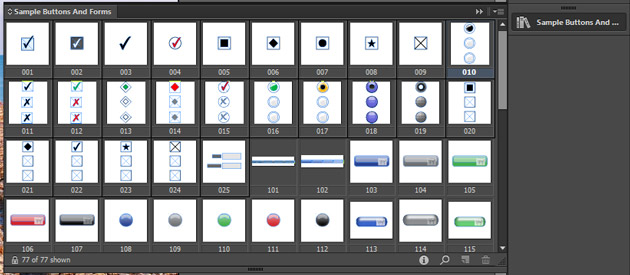
If you would prefer to customise the look of your buttons then you can create them from scratch, but remember to add On and OFF options!
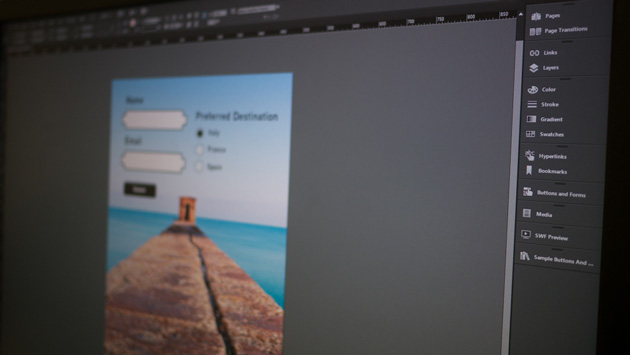
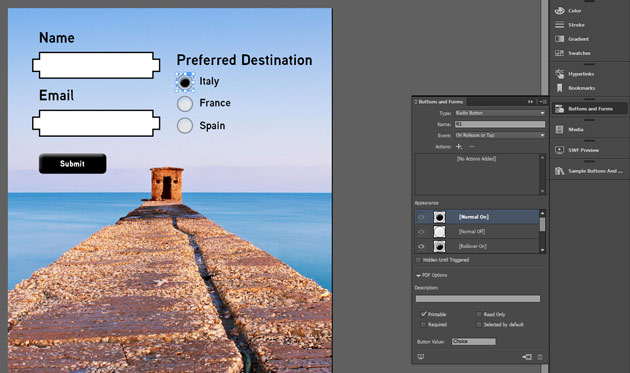
Here's how my form looks with the new buttons, as well as the default settings for the radio buttons I've added:
Event Types
Events are the best way to turn a basic functioning form into something that's a joy to use. Here are you options for events using InDesign CC:
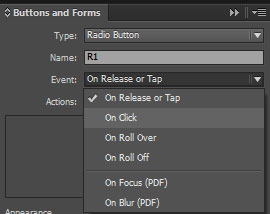
On Release: The most common option - an event that happens after the mouse is released.
On Click: Unlike On Release, On Click events happen as soon as the button is clicked. This doesn't give users the option to cancel the action by pulling their cursor off the button before releasing the mouse.
On Roll Over: When the pointer hovers over the object area.
On Roll Off: When the mouse pointer exists the object area.
On Focus: When the button receives focus through a mouse action or by tabbing through.
On Blur: When the focus is on a different button on form.
By combining different events you can create a user friendly form that guides users to complete the most important actions and doesn't leave them confused.
PDF Form & Button Tab Order
Once you've set up your form it is important to specify the tab order for users who prefer tabbing through their forms (I'm one of them!)
Choose Object > Interactive > Set Tab Order
You will then have a box that allows you to reorder your forms:
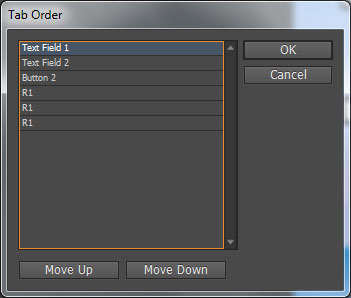
If (unlike me) you have named your forms this is very easy. If you've created your buttons and forms in the right order then they should already be okay, but it's worth double checking.
Exporting Interactive PDF Forms
To finish off, you just need to export your PDF using the Adobe PDF (Interactive) setting.
Make sure that 'Include All Forms and Media' is selected or you will lose all your new forms!
Test your finished PDF form in Acrobat and you're ready to send it out.
This article doesn't even scratch the surface of the cool stuff you can do with InDesign Interactive Forms and Buttons. To do that you'll need to come on our InDesign Training Courses!
Posted under:
 Need Any Help?
Recent Blogs