This year the city celebrates the 10th anniversary of the Brighton Fringe and the 50th anniversary of the Brighton Festival.
In the spirit of the celebrations this year Heather Buckley and David Smith are exhibiting ‘Fringes of Brighton’ 5th May – 6th June 2016 – a showcase of photographs from events in Brighton taken over the last decade at MADE in North Road Brighton.
The exhibition is well worth a visit, it'll make you smile and so will the the coffee, lunch, and cakes.
The work that goes into putting on an exhibition requires a lot of the skills that we teach here. Photoshop and Lightroom of course, but also social media and content marketing. Many artist need to be thier own publicists these days. I managed to speak with Heather and David about their work and also with Leigh-Anne who opened the Gallery and Cafe MADE earlier this year.
I grabbed Heather today to talk about how she produces some of her amazing shots. I enjoy photography so it was a good opportunity to gain a little insight, particularly into the action shots.
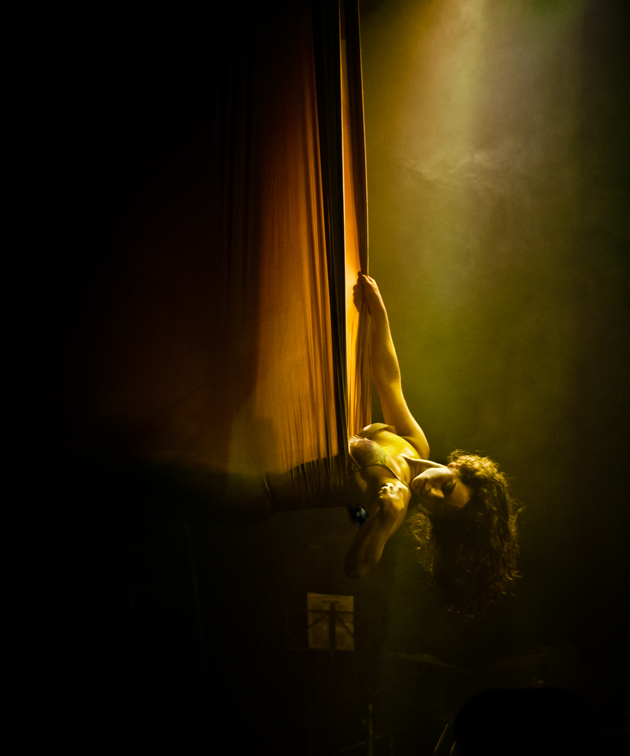
Melissa Marie, Le Scandal Brighton Fringe 2008 - Heather Buckely
Sarah Longbottom
25 May 2016
Your profile and cover photos on social media are an essential consideration when setting up your page but they're often one of the most neglected areas for trainees on our social media courses. They tend to be the first thing any visitor looks at and therefore are your chance to make a great first impression.
Getting the right image for each position and platform can be tough - there's no consistent size or rules that apply - which is why we decided to put together this handy guide to help you get the best images for each of your pages on Facebook, Twitter, Google+, LinkedIn and YouTube.
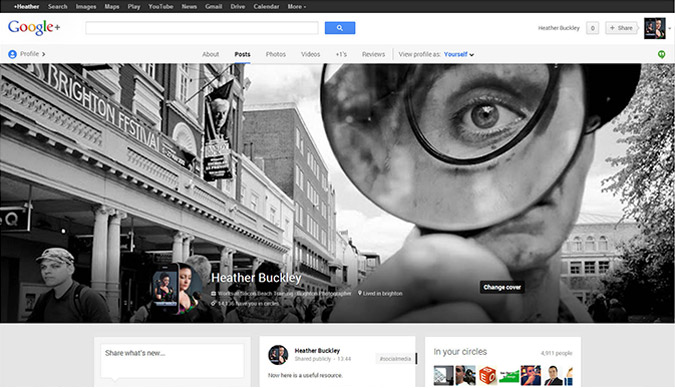
There are two options for you to choose from, depending on your experience and understanding.
If you're a dab hand at Photoshop, we've created a set of social media cover photo templates for you to use. You can download all of them here and to use them, just follow the instructions below. We've also added graphics showing the dimensions for each so you can resize your images without using our templates.
Struggling with images for the web? Photoshop is an essential tool for web marketing and our Photoshop courses are perfect for getting to grips with resizing, cropping and saving images for the web.
Craig Charley
24 May 2013
Minimalist movie posters have almost become an art form in themselves as a way for fans of the films to show their appreciation creatively. The best designs summarise everything you know about the movie while remaining simple and stylish.
With that in mind, we thought we'd take a look at some of the best minimalist posters of some of the best movies of all time, as judged on IMDb. (Attribution has been given where possible.)
If you'd like to be able to create iconic re-imaginings of movie posters like the ones below, come on our InDesign Training Course which will teach you all the skills you need.
So let's start with number 10...
10/ Fight Club by Pedro Vidotto
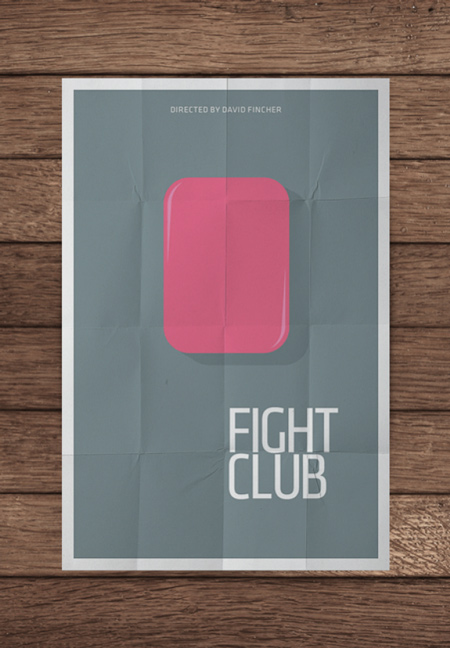
Movie posters don't get much more minimalist than this - a grey background, a bar of soap and exactly 6 words. This might be IMDb's 10th best movie but the poster would be challenging for top spot in this list!
Aaron Charlie
18 Feb 2013
Check out our updated post with cover photo templates and dimensions for all the major social networks.
Facebook Timeline has arrived. First announced in October 2011, Facebook Timeline's official release has been put back, and back, and back again. You've always been able to install it using a Developer preview but at the end of January Timeline went live to the world. Now, it is about to become mandatory.
However, the first thing you will want to do is to customise your Facebook Timeline cover photo! Something you've never been able to do before!
It is a given that by the end of the year, business pages will also have Timelines. This will be a fantastic tool for marketers to make their Facebook page stand out from the rest so use our guide so that you already know what to do when business Timeline is released! For a full course on social media marketing you should come on Social Media Training. We offer some fantastic deals when booked with SEO Training and Content Marketing Training!
As our Google+ profile design template proved so popular we have been kind enough to do the same for Facebook Timeline.
![]()
Download the Facebook Timeline Cover Photo Photoshop Template.
You can get really creative with the new cover photo so we have included some of our favourite designs so far at the bottom of this post.
Leave a link to your profile once you've customised it in the comments section below and we will publish our favourites over the next few weeks.
If you haven't already then make sure you have added us on Facebook for all the latest news, offers and resources:
How to Customise Your Facebook Timeline
We have included a full step by step guide to using the Timeline Photoshop Template in our Complete Timeline Guide. The guide is also useful for changing your privacy settings and delving into all the new features before making your Timeline public.
Craig Charley
13 Feb 2012
Turning simple photos into Warhol-style Pop Art is a great way to impress people with your Photoshop skills. If you're fairly new to Photoshop, you'll find that following this tutorial helps you learn and understand more about cut-outs, layers, groups, colours and scaling.
Coming on our Photoshop course will teach you these kinds of techniques, along with useful keyboard shortcuts and what to do when things aren't going to plan! We also offer Advanced Photoshop training and courses in InDesign and Illustrator.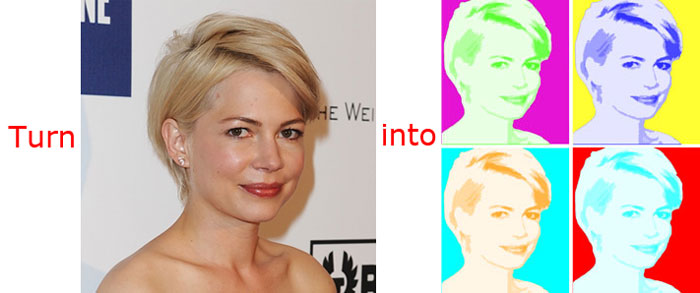
There are 3 main tasks when turning a photo into Pop Art: preparing the main image; duplicating and arranging it; and adding colour.
Aaron Charlie
6 Jul 2012
Photoshop Lightsaber Tutorial
Find out how to create your own Photoshop lightsaber with this easy step-by-step tutorial!
Last weekend my good friend (and self-confessed Sci-Fi fan) Jen went to the London Film Museum, and had this great photo taken of herself brandishing a lightsaber in front of a piece of original Star Wars set. However the image was lacking a little something, which reminded me of a great trick in Photoshop to add a lightsaber effect.
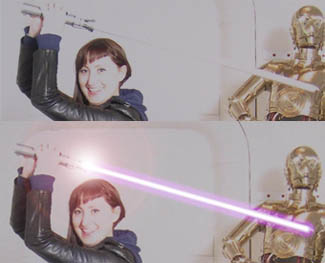
To really get to grips with Photoshop, Silicon Beach Training offer Photoshop Training and Advanced Photoshop Training , as well as InDesign Training in Brighton, Sussex. And for all those programming geeks reading this – did you know that we also now offer JavaScript Training, jQuery Training and Ajax Training too?!
So – here’s how to add a Photoshop lightsaber effect…
How to Create a Lightsaber Effect in Photoshop CS5
Here’s the original image – as you can see Jen’s got her lightsaber, but it’s just a white stick, which looks rubbish.
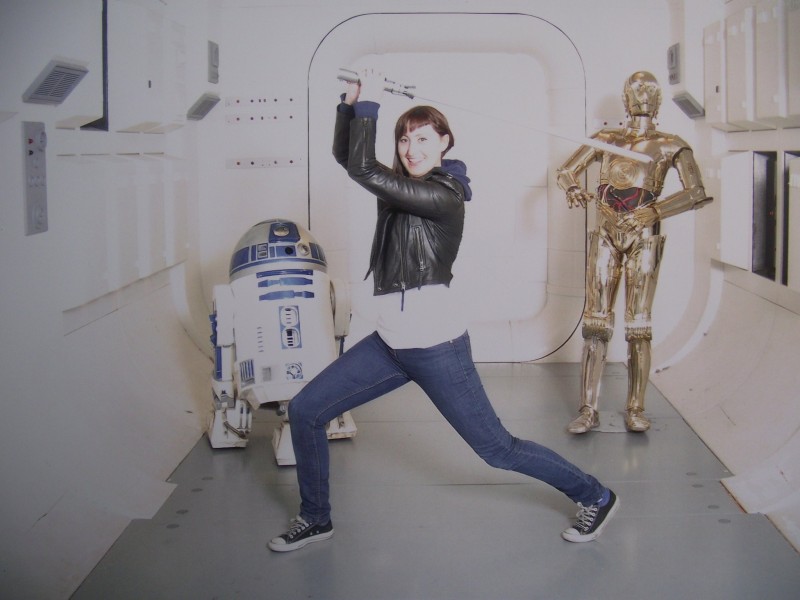
If you want to use this image for the Photoshop tutorial you can download it here – but much better to use your own. If you don’t have a toy light saber it doesn't matter – just strike the pose with something that looks like a light saber handle, and Photoshop can do the rest!!
Aaron Charlie
23 Feb 2011
The best Photoshop blogs to inform and inspire you...
Blogging is all the rage these days and we are even running Blogging Training as of the 24th of May - if your business isn't blogging, it should be!
For fellow Photoshop fans we've scoured the web to bring you our favorite Photoshop blogs for either informative

Photoshop Training, news and tips or for inspiring Photoshop feats (if you're looking for the best Photoshop tutorial websites try this list). There are a lot of blogs out there, so read on to find the ones we thought most stood out...
Aaron Charlie
14 May 2010
Photoshop tools are found in the Toolbox, which appears on the left side of the screen when you first start Photoshop. When you see a little arrow in the bottom corner it means that you can reveal other tools by clicking on the arrow. You can learn more about all the Photoshop tools and how they are used on our Photoshop courses, including Lightroom training.
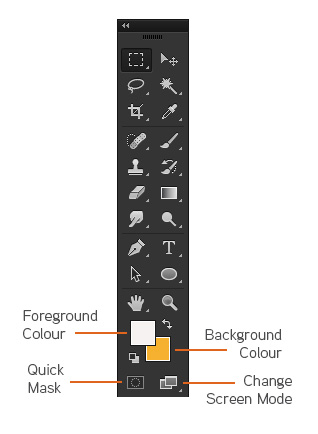
Apart from the Photoshop tools listed below you can select your foreground and background colours here. Double clicking on foreground or background squares will bring up the colour picker.
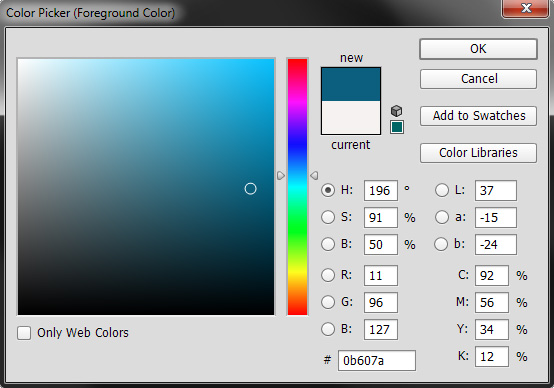
Clicking on the small black and white squares will bring the colour well back to black and white. Some useful keyboard shortcuts to remember and get used to are the X key to swap the foreground and background colours, and D to set the colours to their default settings.
You can also create masks (though it can be easier through the layers palette), change workspace view or go to image ready.
| Button | Tool Name | Action |
|---|---|---|
| Rectangular Marquee | Rectangular Marquee - Makes a rectangular selection and provides access to the Elliptical, Single Row, and Single Column Marquee Tools | |
| Move | Move - Moves selections, layers, and guides (rulers) | |
| Lasso | Lasso - Draws free-hand segments of a selection's border and provides access to the Polygonal Lasso Tool and Magnetic Lasso Tool | |
| Magic Wand | Magic Wand - Selects consistently coloured areas without requiring you to trace the outline | |
| Crop | Crop - Removes unwanted portions from an image. | |
| Eyedropper | Eyedropper - Allows you to get colors from an image to designate as a new background or foreground color. It also provides access to the Color Sampler and Measure Tools | |
| Spot Healing Brush | Spot Healing Brush - Corrects imperfections in an image by making them disappear into the surrounding image. It also provides access to the Healing Brush Tool, Patch Tool, and the Red Eye Tool | |
| Brush | Brush - Paints brush strokes onto an image and provides access to the Pencil Tool and Color Replacement Tool | |
| Clone Stamp | Clone Stamp - Paints a clone of an image or area of an image you have already selected. It also provides access to the Pattern Stamp Tool | |
| History Brush | History Brush - Paints a copy of one image state or snapshot of an image into your current image's window. It also provides access to the Art History Brush Tool | |
| Eraser | Eraser - Erases pixels wherever the mouse is clicked. It also provides access to the Background Eraser and Magic Eraser Tools | |
| Gradient | Gradient - Creates a gradual blend fill between colors and also provides access to the Paint Bucket Tool. For more information, see Working with the Gradient Tool | |
| Blur | Blur - Softens the edges of an image. It also provides access to the Sharpen and Smudge Tools | |
| Dodge | Dodge - Allows you to darken or lighten areas of an image. It also provides access to the Burn and Sponge Tools | |
| Path Selection | Path Selection - Makes shape or segment selections that show anchor points, direction lines, and direction points. It also provides access to the Direct Selection Tool | |
| Horizontal Type | Horizontal Type - Allows you to insert text onto an image. It also provides access to the Vertical Type, Horizontal Type Mask, and Vertical Type Mask Tools | |
| Pen | Pen - Allows you to create, edit, or smooth lines and shapes. It also provides access to the Freeform Pen, Add Anchor Point, Delete Anchor Point, and Convert Point Tools | |
| Draw Rectangle | Rectangle - Allows you to draw different shapes. It also provides access to the Rounded Rectangle, Ellipse, Polygon, Line, and Custom Shape Tools. | |
| 3D Rotate Tool | 3D Rotate Tool - Allows you to rotate the document canvas. It also provides access to the 3d Roll View, Pan View, Walk View and Zoom Tools. | |
| 3D Orbit Tool | 3D Rotate Tool - Allows you to change the position or scale of a 3D model.. It also provides access to the 3d Rotate, 3D Roll, 3D Pan, 3D Slide and 3D Scale Tools. | |
| Hand | Hand - Moves an image within its window | |
| Zoom | Zoom - Magnifies or reduces the view size of an image |
Heather Buckley
21 Feb 2007