 Enquiry Now

 Contact Us


 Check Out
 +44 20 4571 2395

 PRINCE2® Foundation and Practitioner Training


|
when it comes to social media there is an ever-increasing number of online channels which can be used to quickly spread the word about your projects, products and services. But the wide range of choices available and the software available to manage social media can be daunting. When it comes to managing your social media, consider what your business priorities are and what areas you need to focus on daily, weekly or monthly. Planning your social media activity is crucial! |
 |
We've made life a little easier with our updated downloadable free Social Media Schedule .PDF!
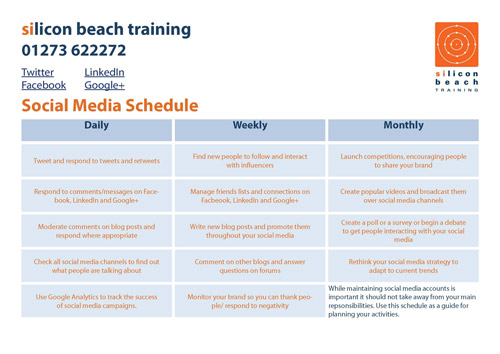
Daily
Daily social media tasks are crucial for maintaining your image and conversing with others. While it is not time effectively to always be on Twitter and Facebook you want to make sure you respond to any communication quickly.
- Twitter - Tweet and respond to tweets and retweets - Tools such as TweetDeck and HootSuite are great ways to manage Twitter and if there's a topic you want to keep an eye on you can create a search column using the related hashtag.
- Google+ - respond to mentions and comments on your posts, scan the feed for interesting content to +1.
- Facebook - check your profile, pages and groups and respond as appropriate.
- LinkedIn - respond to private messages and posts/comments in your groups if you have any.
- Blogs - Respond to comments on your own blog posts - this opens up a dialogue between you and your users/followers, maximising opportunities for business relationships and reciprical marketing.
- Bookmarking - Scan what's popular on bookmarking and recommendation sites such as Delicious, Stumbleupon and Digg and then add your own bookmarks accordingly.
- Analytics - Google Analytics is the main choice for clear and concise information and it now features real time reporting. This is great as you can monitor your traffic from social media channels during campaigns to find our what elements of your social media strategy are the most successful.
Weekly
 Heather Buckley
 21 Oct 2011
|
when it comes to social media there is an ever-increasing number of online channels which can be used to quickly spread the word about your projects, products and services. But the wide range of choices available and the software available to manage social media can be daunting. When it comes to managing your social media, consider what your business priorities are and what areas you need to focus on daily, weekly or monthly. Planning your social media activity is crucial! |
|
We've made life a little easier with our updated downloadable free Social Media Schedule .PDF!
Daily
Daily social media tasks are crucial for maintaining your image and conversing with others. While it is not time effectively to always be on Twitter and Facebook you want to make sure you respond to any communication quickly.
- Twitter - Tweet and respond to tweets and retweets - Tools such as TweetDeck and HootSuite are great ways to manage Twitter and if there's a topic you want to keep an eye on you can create a search column using the related hashtag.
- Google+ - respond to mentions and comments on your posts, scan the feed for interesting content to +1.
- Facebook - check your profile, pages and groups and respond as appropriate.
- LinkedIn - respond to private messages and posts/comments in your groups if you have any.
- Blogs - Respond to comments on your own blog posts - this opens up a dialogue between you and your users/followers, maximising opportunities for business relationships and reciprical marketing.
- Bookmarking - Scan what's popular on bookmarking and recommendation sites such as Delicious, Stumbleupon and Digg and then add your own bookmarks accordingly.
- Analytics - Google Analytics is the main choice for clear and concise information and it now features real time reporting. This is great as you can monitor your traffic from social media channels during campaigns to find our what elements of your social media strategy are the most successful.
Weekly
Heather Buckley
21 Oct 2011
Check out our updated post on how to get the perfect
social media cover photos;including for the new Google+ Layout.
Download and unzip our Photoshop Template

Step 2:
Open up the template in Photoshop. We've left the images of my face in the template so you can see how it all works - but if you don't want to see my face (and I can sympathise with your position if you don't) then either hide or delete the "Colin" Layers!
Next you'll want to import the image (or images) that you want to use in your own profile.
To do this, select File > Place and select your image file.
Drag and resize it so its in the correct position, and hit enter to place it:
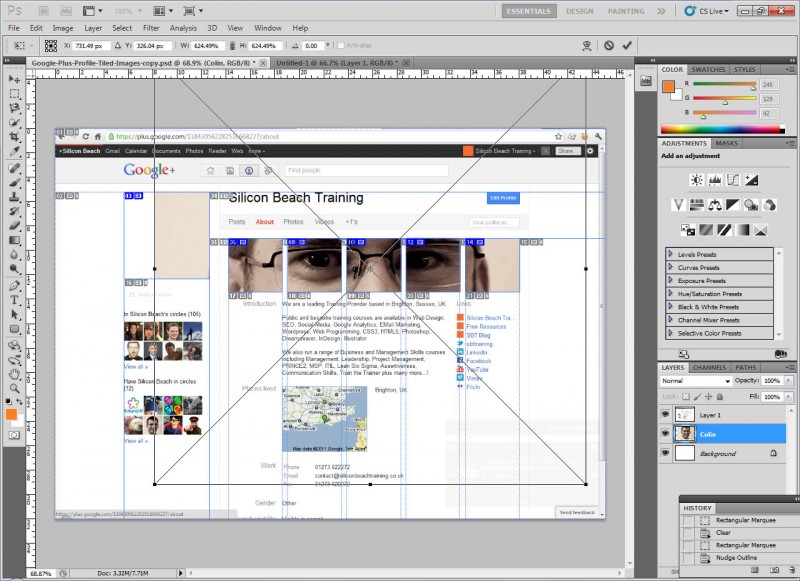
Click on the image for full size version
Aaron Charlie
9 Jul 2011
Check out our updated post on how to get the perfect
social media cover photos;including for the new Google+ Layout.
Download and unzip our Photoshop Template
Step 2:
Open up the template in Photoshop. We've left the images of my face in the template so you can see how it all works - but if you don't want to see my face (and I can sympathise with your position if you don't) then either hide or delete the "Colin" Layers!
Next you'll want to import the image (or images) that you want to use in your own profile.
To do this, select File > Place and select your image file.
Drag and resize it so its in the correct position, and hit enter to place it:
Click on the image for full size version
Aaron Charlie
9 Jul 2011
NEW! We've launched our ownResponsive Web Design Course. Learn how to design and build sites that will render on any screen without losing functionality with our best practice workshop. Combine the course with HTML5, CSS3 & JavaScript on our Mobile Web Week and you will be able to build your own sites from scratch!
5 years ago, the only considerations web designers really had to deal with when designing for different users were cross browser testing and different screen resolutions.
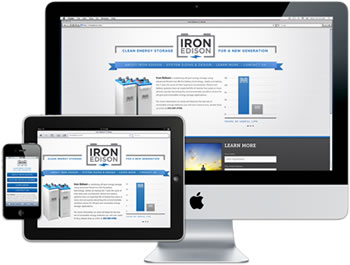 |
Today (and forevermore!), to ensure that your website is truly accessible to all of your users, you have to make sure that your design works for a huge range of mobile devices - iPhones, iPads, Blackberries etc etc... all with different browsers and screen resolutions (many of which are now in 'portrait' orientation, as opposed to the traditional 'landscape' web browser)
One way of doing this is to design a different version of your site for every device - however that's a lot of work.
Enter Responsive Web Design..
What is Responsive Web Design?
Responsive Web design is an approach to web design that ensures that your site responds to your user’s environment, and to their behaviour, based on a range of variables including screen size, platform and orientation.
Rather than create multiple versions of a site for each device - ONE website design will be suitable for all users, by using flexible layouts, images and CSS techniques including media queries. The website adjusts itself to the user - rather than the other way round.
HTML5 and CSS3 are an important part of responsive web design, and as more and more browsers begin to support these technologies responsive websites will become more popular.
Aaron Charlie
20 Jun 2011
NEW! We've launched our ownResponsive Web Design Course. Learn how to design and build sites that will render on any screen without losing functionality with our best practice workshop. Combine the course with HTML5, CSS3 & JavaScript on our Mobile Web Week and you will be able to build your own sites from scratch!
5 years ago, the only considerations web designers really had to deal with when designing for different users were cross browser testing and different screen resolutions.
|
Today (and forevermore!), to ensure that your website is truly accessible to all of your users, you have to make sure that your design works for a huge range of mobile devices - iPhones, iPads, Blackberries etc etc... all with different browsers and screen resolutions (many of which are now in 'portrait' orientation, as opposed to the traditional 'landscape' web browser)
One way of doing this is to design a different version of your site for every device - however that's a lot of work.
Enter Responsive Web Design..
What is Responsive Web Design?
Responsive Web design is an approach to web design that ensures that your site responds to your user’s environment, and to their behaviour, based on a range of variables including screen size, platform and orientation.
Rather than create multiple versions of a site for each device - ONE website design will be suitable for all users, by using flexible layouts, images and CSS techniques including media queries. The website adjusts itself to the user - rather than the other way round.
HTML5 and CSS3 are an important part of responsive web design, and as more and more browsers begin to support these technologies responsive websites will become more popular.
Aaron Charlie
20 Jun 2011
How many of you have installed Google Analytics tracking code on your site, but only ever look at the Top Content and Traffic Sources reports?! Sound like you? If so - don't be embarrassed - you're not alone!
However - Google Analytics is about much more than just seeing which of your pages get the most hits, and which keywords are working best for you.

Google Analytics is as much a tool for tracking user behaviour and refining user interface design as it is for monitoring the success of your SEO campaigns. And setting up Goals in Google Analytics is a great way to do this.
Most people know that Google Analytics Goals are there, but don't know how to set them up, or how they can be used. Goals and funnels are covered in our Advanced Google Analytics Training course.
So - as a little freebie here's our beginners guide to setting up Goals in Google Analytics:
How to Set Up a Goal in Google Analytics
What are Google Analytics Goals For?
Before you start setting up any Google Analytics Goals - think about what you want people to do on your site. Do you want them to complete a booking form, or send you an e-mail, or add a product to their shopping cart?
Whatever the user behaviour is that you're trying to achieve is going to be your conversion
Google Analytics Goals are there to track how many times your users convert - and make you money!
What am I tracking?
A very simple goal would just be to count every time someone filled in the booking form, or sent you that e-mail or whatever your conversion is .
However that doesn't tell you anything about how users got to that part of your site, or tell you about the other hundred users who left before they converted (either because the site is badly designed, or your product is too expensive etc...)
Google Analytics allows you to track each stage in the users visit.
For instance, you might want users to enter via a particular landing page, then click on details of a service of product, then fill out the booking form - and a goal will allow you to track each of those stages.
How to set up a Google Analytics Goal
In this example - we're going to track how many users:
1) Visited the Google Analytics Resources page on our site
2) Then looked at the guide to installing Google Analytics Tracking code
3) Then looked at our Google Analytics Training course page
So ...
Log in to your Google Analytics account - now click on edit next to the profile you want to add your goal to:
![]()
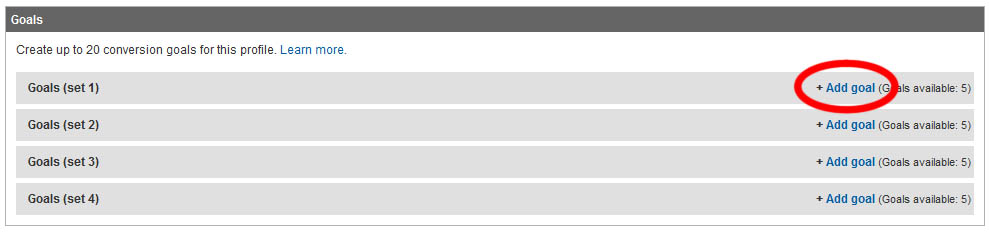
Now on the Profile Settings page - click on Add Goal under Goal Set 1 (presuming you don't already have goals there - otherwise use Goal Set 2, 3 or 4)
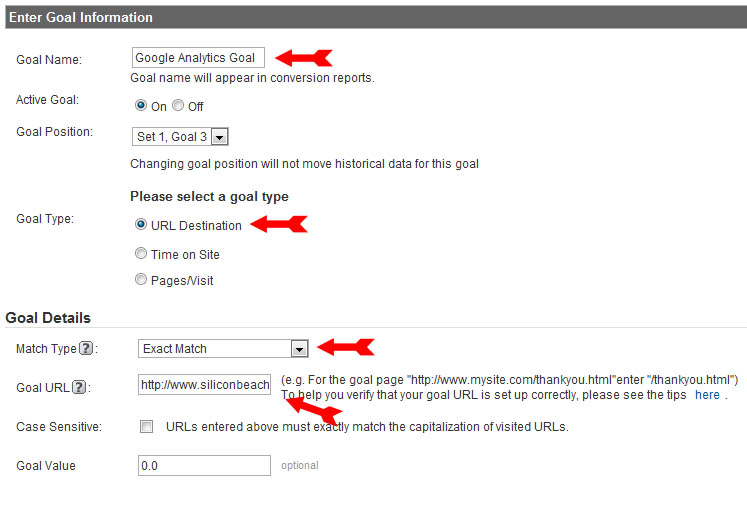
Now under Goal Information - complete the following:
--READ MORE--
Goal Name: Give your Goal a sensible name - e.g. "Purchase Product X", or "Complete Form Y" etc...
Goal Type: Make this URL Destination as this goal is about people ending up on a specific page (you can also set up "time of visit" and "depth of visit" goals)
Match Type: In this example we're setting it as Exact Match as we are counting the number of people who end up on a specific page - however if you want to track how many people who end up on any page within a certain section of your site, use Head Match (see below)
Goal URL: If you're using Exact Match - enter the exact URL of the page that counts as a conversion here. If you're using Head Match, use the first part of the URL only e.g - if you set your Destination URL to www.mysite.com/category-a/, the goal will count anyone who visits www.mysite.com/category-a/page-1/ or www.mysite.com/category-a/page-2/ and so on.
NOTE - Some conversion pages don't have their own URL - e.g. you may want to track how many people complete your order form and press "submit" - but the URL of that form might not change when they press the "submit" button. In these instances you need to either set up a Virtual Page View for when the button is clicked, or use Event Tracking so you can track these goals properly. We don't have room to cover that here - but watch this space as we may treat you to a guide on it later!
Setting up a Google Analytics Funnel
OK - so we've set the Goal URL - which is the page that counts as our conversion - however this will only tell us how many people have hit that page.
By setting up a funnel, we can also track how many users are coming through the pages we want them to, and how many are dropping out.
To do this, click on "Yes, Create a Funnel for this Goal" and you will be given the opportunity to add as many other URLS as Goal Funnel Steps as you like (and name them so they make sense in the report!)
In this instance my funnel starts at our Google Analytics Resources page, then goes to our post on How to Install Google Analytics Code, and finishes off at our Google Analytics Training Course page (which I set as the Goal URL) - so my funnel settings look like this:
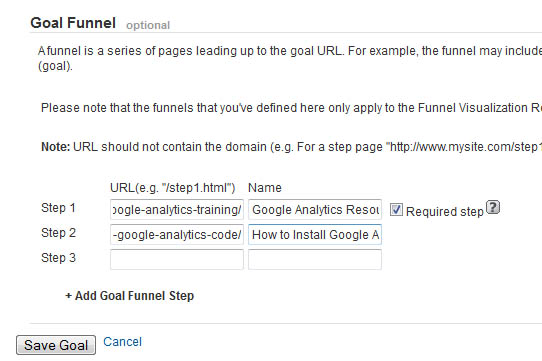
Now save your goal - and wait for the results to start flooding in!
Looking at your Goal Reports
Just after you've set up your goal you're not going to have any data - but after a few days and you'll be able to see how many conversions you've achieved. To do this - go to the main dashboard for your profile and click on Goals (at the bottom)
If you have more than one goal set up, the first thing you'll see is a total conversions graph (which is all goals added up) - to see the number of conversions for each goal, click on its title and you can drill down in to the results.
To see your Funnel - click on the "Funnel Visualisation" option, and you'll see something like this (not much data at the moment!):
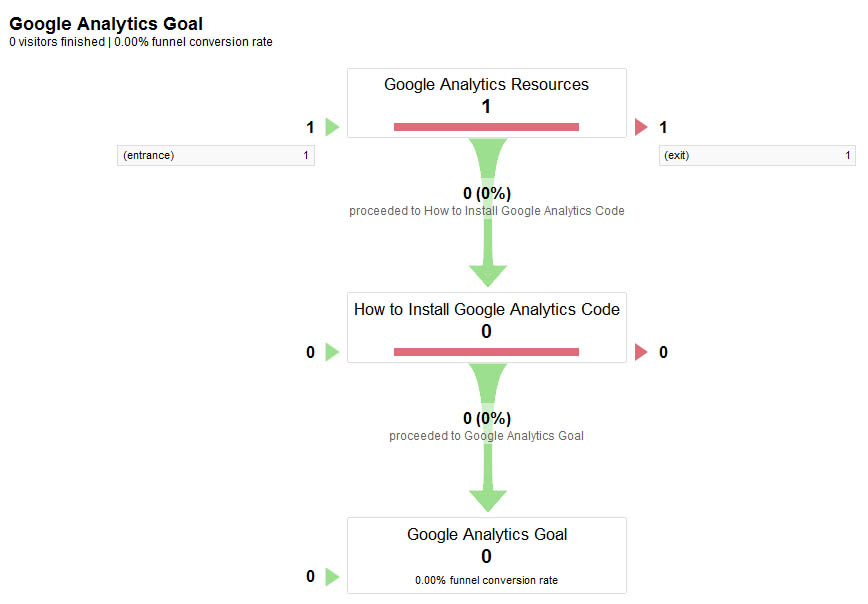
OK - so at the moment we've only got data about one visitor (and they left straight away!) However in time funnels become a really useful ready-reckoner to let you know how many people are making it all the way through your sales process to buy something - and if they're not, at which point most of them are dropping out, so that you can redesign your pages or adjust your product pricing to achieve more conversions.
Best practice is to start making changes from the bottom of the funnel up - i.e first try to increase the number of conversions for people who are nearly getting there - and then work your way up!
Good luck - and happy funneling!
Aaron Charlie
6 Jun 2011
How many of you have installed Google Analytics tracking code on your site, but only ever look at the Top Content and Traffic Sources reports?! Sound like you? If so - don't be embarrassed - you're not alone!
However - Google Analytics is about much more than just seeing which of your pages get the most hits, and which keywords are working best for you.
Google Analytics is as much a tool for tracking user behaviour and refining user interface design as it is for monitoring the success of your SEO campaigns. And setting up Goals in Google Analytics is a great way to do this.
Most people know that Google Analytics Goals are there, but don't know how to set them up, or how they can be used. Goals and funnels are covered in our Advanced Google Analytics Training course.
So - as a little freebie here's our beginners guide to setting up Goals in Google Analytics:
How to Set Up a Goal in Google Analytics
What are Google Analytics Goals For?
Before you start setting up any Google Analytics Goals - think about what you want people to do on your site. Do you want them to complete a booking form, or send you an e-mail, or add a product to their shopping cart?
Whatever the user behaviour is that you're trying to achieve is going to be your conversion
Google Analytics Goals are there to track how many times your users convert - and make you money!
What am I tracking?
A very simple goal would just be to count every time someone filled in the booking form, or sent you that e-mail or whatever your conversion is .
However that doesn't tell you anything about how users got to that part of your site, or tell you about the other hundred users who left before they converted (either because the site is badly designed, or your product is too expensive etc...)
Google Analytics allows you to track each stage in the users visit.
For instance, you might want users to enter via a particular landing page, then click on details of a service of product, then fill out the booking form - and a goal will allow you to track each of those stages.
How to set up a Google Analytics Goal
In this example - we're going to track how many users:
1) Visited the Google Analytics Resources page on our site
2) Then looked at the guide to installing Google Analytics Tracking code
3) Then looked at our Google Analytics Training course page
So ...
Log in to your Google Analytics account - now click on edit next to the profile you want to add your goal to:
![]()
Now on the Profile Settings page - click on Add Goal under Goal Set 1 (presuming you don't already have goals there - otherwise use Goal Set 2, 3 or 4)
Now under Goal Information - complete the following:
--READ MORE--
Goal Name: Give your Goal a sensible name - e.g. "Purchase Product X", or "Complete Form Y" etc...
Goal Type: Make this URL Destination as this goal is about people ending up on a specific page (you can also set up "time of visit" and "depth of visit" goals)
Match Type: In this example we're setting it as Exact Match as we are counting the number of people who end up on a specific page - however if you want to track how many people who end up on any page within a certain section of your site, use Head Match (see below)
Goal URL: If you're using Exact Match - enter the exact URL of the page that counts as a conversion here. If you're using Head Match, use the first part of the URL only e.g - if you set your Destination URL to www.mysite.com/category-a/, the goal will count anyone who visits www.mysite.com/category-a/page-1/ or www.mysite.com/category-a/page-2/ and so on.
NOTE - Some conversion pages don't have their own URL - e.g. you may want to track how many people complete your order form and press "submit" - but the URL of that form might not change when they press the "submit" button. In these instances you need to either set up a Virtual Page View for when the button is clicked, or use Event Tracking so you can track these goals properly. We don't have room to cover that here - but watch this space as we may treat you to a guide on it later!
Setting up a Google Analytics Funnel
OK - so we've set the Goal URL - which is the page that counts as our conversion - however this will only tell us how many people have hit that page.
By setting up a funnel, we can also track how many users are coming through the pages we want them to, and how many are dropping out.
To do this, click on "Yes, Create a Funnel for this Goal" and you will be given the opportunity to add as many other URLS as Goal Funnel Steps as you like (and name them so they make sense in the report!)
In this instance my funnel starts at our Google Analytics Resources page, then goes to our post on How to Install Google Analytics Code, and finishes off at our Google Analytics Training Course page (which I set as the Goal URL) - so my funnel settings look like this:
Now save your goal - and wait for the results to start flooding in!
Looking at your Goal Reports
Just after you've set up your goal you're not going to have any data - but after a few days and you'll be able to see how many conversions you've achieved. To do this - go to the main dashboard for your profile and click on Goals (at the bottom)
If you have more than one goal set up, the first thing you'll see is a total conversions graph (which is all goals added up) - to see the number of conversions for each goal, click on its title and you can drill down in to the results.
To see your Funnel - click on the "Funnel Visualisation" option, and you'll see something like this (not much data at the moment!):
OK - so at the moment we've only got data about one visitor (and they left straight away!) However in time funnels become a really useful ready-reckoner to let you know how many people are making it all the way through your sales process to buy something - and if they're not, at which point most of them are dropping out, so that you can redesign your pages or adjust your product pricing to achieve more conversions.
Best practice is to start making changes from the bottom of the funnel up - i.e first try to increase the number of conversions for people who are nearly getting there - and then work your way up!
Good luck - and happy funneling!
Aaron Charlie
6 Jun 2011
 Need Any Help?
Recent Blogs

 Enquire Now


