 Enquiry Now

 Contact Us


 Check Out
 +44 20 4571 2395

 PRINCE2® Foundation and Practitioner Training


Want to know how to change the default calendar in Microsoft Project to reflect your actual working project hours? This tutorial from our MS Project trainer Maggie will give you a glimpse of the sort of content you'll learn on our beginners Microsoft Project courses. We also run PRINCE2 courses and an Introduction to Project Management workshop so you can gain the skills to stop your projects from running overtime.

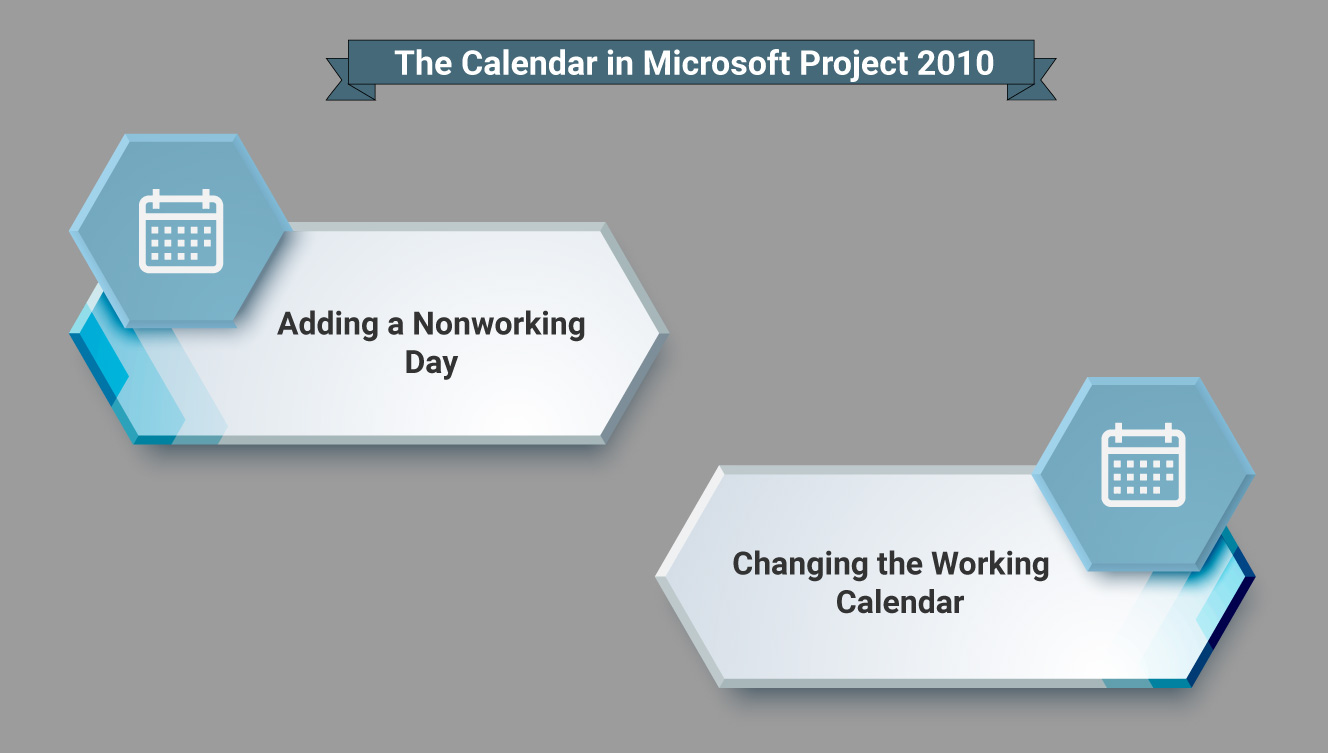
The Default Calendar in Microsoft Project is set to an 8 hour day, the Start time being 8:00 am and the finish 5:00 pm, with an hour for lunch. This calendar is called the Standard Calendar and is the calendar initially used for all Projects. This calendar can be found from the Project Menu, Change Working Time.

This calendar can be modified to reflect the working hours for an entire project. You can modify the working hours to the actual working hours for your Company, so if your standard Company hours are 9:00 am to 17:30 pm with an hour for lunch you can change the calendar to these times. With this calendar you are setting the Work Hours for your people
However, there is also a calendar that is used when you enter your tasks, this can be found in the File Menu, Tools and Schedule tab. You can set in here the start and finish times for the tasks, hours per day and hours per week. It is important that you change the calendar before entering any tasks. If the calendar is changed afterwards, the duration of the tasks will change to reflect the new hours, thus changing what you have already set.

If you are changing times for the tasks, it is important to change the resource calendar to the same time, otherwise when you assign your resources the durations of your tasks will change. Follow the instructions below to see how to do this.
 Guest Author
 31 Aug 2012

Responsive web design is vital for making sure your visitors get as great an experience on their mobile as their desktop while browsing your site.
Our tutorials often aim at the beginner end of the scale, but this week we're going for something a bit more advanced. In this tutorial our HTML5 & CSS3 trainer Giselle explains how to convert navigation to a dropdown menu for smaller screens using CSS3 media queries.
This is one of the topics covered on our Mobile Web Design Week which combines our HTML5 & CSS3 Course with JavaScript training to give you a tool kit for designing mobile sites and also teaches you a best practice approach for responsive web design.

This tutorial assumes a familiarity with responsive web design and using CSS3 media queries to create different sets of styles for mobile devices. Click the links to find out more.
You do not have to test this in a mobile device. To test in your browser, simply resize your screen to the required width.
Why Convert to a Dropdown Menu?
If you have more than three buttons in your main navigation your menu will wrap or overlap when you decrease the width of your web page to fit it to a smaller mobile device screen. A popular method to get around this is to convert your menu to a dropdown. Other alternatives are to use display: block, or to use JavaScript or JQuery to toggle a menu when an icon or button is clicked on. Using display: block is a simple and quick way to style navigation for mobile dropdowns but won't work for menus with many links in them. Using JQuery to toggle the menu requires some knowledge of JQuery and JavaScript. Which method you use will depend on the particular site you are working on. This tutorial shows you how to use the first method and is quick and simple to implement.
Giselle
5 Oct 2012
Responsive web design is vital for making sure your visitors get as great an experience on their mobile as their desktop while browsing your site.
Our tutorials often aim at the beginner end of the scale, but this week we're going for something a bit more advanced. In this tutorial our HTML5 & CSS3 trainer Giselle explains how to convert navigation to a dropdown menu for smaller screens using CSS3 media queries.
This is one of the topics covered on our Mobile Web Design Week which combines our HTML5 & CSS3 Course with JavaScript training to give you a tool kit for designing mobile sites and also teaches you a best practice approach for responsive web design.
This tutorial assumes a familiarity with responsive web design and using CSS3 media queries to create different sets of styles for mobile devices. Click the links to find out more.
You do not have to test this in a mobile device. To test in your browser, simply resize your screen to the required width.
Why Convert to a Dropdown Menu?
If you have more than three buttons in your main navigation your menu will wrap or overlap when you decrease the width of your web page to fit it to a smaller mobile device screen. A popular method to get around this is to convert your menu to a dropdown. Other alternatives are to use display: block, or to use JavaScript or JQuery to toggle a menu when an icon or button is clicked on. Using display: block is a simple and quick way to style navigation for mobile dropdowns but won't work for menus with many links in them. Using JQuery to toggle the menu requires some knowledge of JQuery and JavaScript. Which method you use will depend on the particular site you are working on. This tutorial shows you how to use the first method and is quick and simple to implement.
Giselle
5 Oct 2012
There is more to Excel than you realise
In this post I share three of my favourite Excel tips that - once you know how - become very useful. Most people who use Excel have only just scratched the surface, if you take the time to learn more about Excel, you could really achieve a lot more at work and at home. Learning Excel is time consuming, and a near impossible task to do on your own. We provide regular Excel resources and tips on the blog, but nothing beats hands-on, classroom based Excel training.

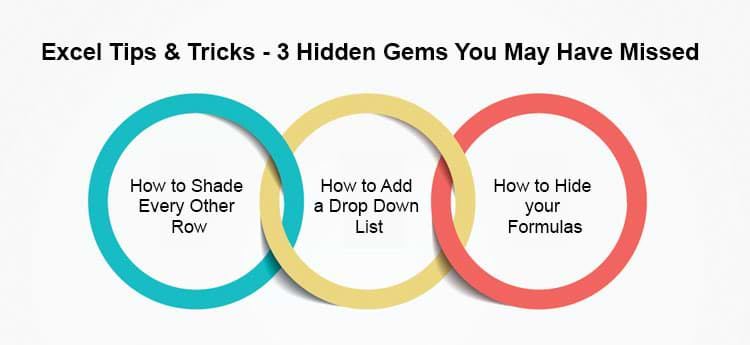
Here are three Excel tips that come in handy once you know what you're doing:
How to Shade Every Other Row
When you have a long list of data that stretches across the page it can sometime be difficult to read each line precisely across. One way to help you, and your eyes, is to make every other row a different colour.

- Highlight all the rows you want to make easier to read
- Click Conditional Formatting in the 'Styles' section of the ribbon
- Select New Rule > Use a formula to determine which cells to format
- In the box marked 'Format values where this formula is true enter the formula =MOD(ROW(),2)=0
- Click on the 'Format' box to apply your desired styling to every other line.
- For simple shading, click on the 'Fill' tab and click on the lightest grey.
- Apply the conditional formatting and your spreadsheet should now be nice and stripy, and more importantly - easy to read:

Andy Trainer
19 Oct 2012
There is more to Excel than you realise
In this post I share three of my favourite Excel tips that - once you know how - become very useful. Most people who use Excel have only just scratched the surface, if you take the time to learn more about Excel, you could really achieve a lot more at work and at home. Learning Excel is time consuming, and a near impossible task to do on your own. We provide regular Excel resources and tips on the blog, but nothing beats hands-on, classroom based Excel training.
Here are three Excel tips that come in handy once you know what you're doing:
How to Shade Every Other Row
When you have a long list of data that stretches across the page it can sometime be difficult to read each line precisely across. One way to help you, and your eyes, is to make every other row a different colour.
- Highlight all the rows you want to make easier to read
- Click Conditional Formatting in the 'Styles' section of the ribbon
- Select New Rule > Use a formula to determine which cells to format
- In the box marked 'Format values where this formula is true enter the formula =MOD(ROW(),2)=0
- Click on the 'Format' box to apply your desired styling to every other line.
- For simple shading, click on the 'Fill' tab and click on the lightest grey.
- Apply the conditional formatting and your spreadsheet should now be nice and stripy, and more importantly - easy to read:
Andy Trainer
19 Oct 2012
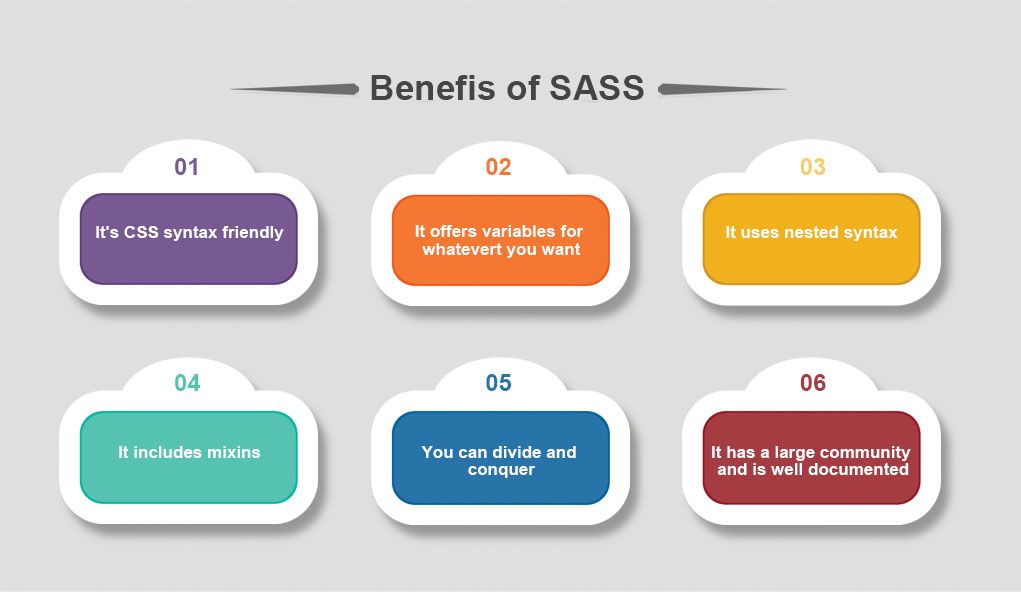
Sass stands for Syntactically Awesome Style Sheets. After a quick look, I thought that it was better suited to larger sites and involved programming. After a second look, the scales fell from my eyes. Sass organizes your stylesheets efficiently and drastically cuts down on your development time. It uses some programming tools, e.g. variables, while being accessible to non-programmers.
We offer Sass Training as a private course for individuals who already know CSS and want to start working faster and better with their stylesheets.

What is Sass?
Sassis a CSS preprocessor. You start off by creating a Sassstylesheet, e.g. style.scss. You then use an app or the command line to output that file into a normal CSS file, e.g. style.css.
Giselle
27 May 2014
Sass stands for Syntactically Awesome Style Sheets. After a quick look, I thought that it was better suited to larger sites and involved programming. After a second look, the scales fell from my eyes. Sass organizes your stylesheets efficiently and drastically cuts down on your development time. It uses some programming tools, e.g. variables, while being accessible to non-programmers.
We offer Sass Training as a private course for individuals who already know CSS and want to start working faster and better with their stylesheets.
What is Sass?
Sassis a CSS preprocessor. You start off by creating a Sassstylesheet, e.g. style.scss. You then use an app or the command line to output that file into a normal CSS file, e.g. style.css.
Giselle
27 May 2014

We believe that the best way to learn is practical, face to face training with an expert on-hand to help solve any problems.
However, we recognise that not everyone is able to take the time off from work for classroom based training (especially if retraining for a new career).
We have scoured the web to find the best resources to help you learn to code for free;online and at your own pace.

Before you get stuck in, make sure to look through our range of Web Design, Mobile Development and Programming courses. We cover all coding languages from beginner to advanced level.
Our popular Responsive Web Week includes HTML5 & CSS3,JavaScript and Responsive Web Design Training- everything you need to start building websites from scratch using modern best practice.
We also offer HTML & CSS workshops for beginners.
Aaron Charlie
22 May 2014
 Need Any Help?
Recent Blogs


 Enquire Now


